You may already know that Gravity Forms has permissions capabilities for your forms. However, with the core plugin, all user roles get access to all forms for that capability. This can be a hassle, especially if your organization has a large team in various departments, each needing individualized access.
Imagine you have a couple of forms that collect new customer data — one with subscriber contact info and one with billing information. Your marketing team may need access to the form that displays that customer’s email address, but they don’t need to (and shouldn’t) be able to see the billing information. On the flip side, your billing department doesn’t need to see subscriber preferences, like which email list they’re on.
Advanced Permissions allows you to control the capabilities for specific user roles or users on a per-form level. For example, you can restrict the user roles for your marketing team so they can see subscriber info but not invoices. Similarly, you can create rules to allow users to edit forms and view entries — or deny those capabilities on each form or even for specific form fields.
You can also set up default permissions that automatically apply to any new form created. If you create lots of forms and need granular access control, this is a game-changer.
How to Use Advanced Permissions
It’s easier than ever to set up rules and configure permissions for any user role or user on your site. You can do this for any form you’ve created using Gravity Forms. Let’s get started!
Installation
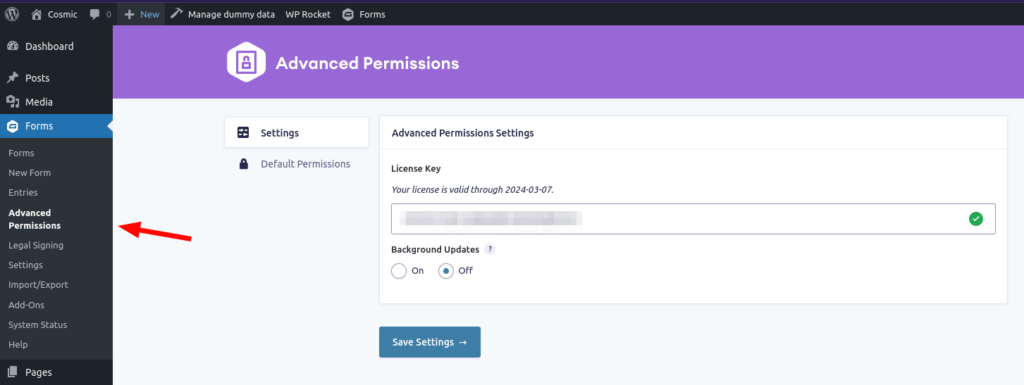
First, you need to be using the Gravity Forms plugin to create your forms. Then, you need to get our Advanced Permissions plugin.
Once Advanced Permissions is activated on your site, you’ll see the new item under your Gravity Forms menu.
Now, create a simple form, and let’s set up some permissions.
Creating Rules for Your Forms
For our example, I’ve created a super simple form with just a few fields.
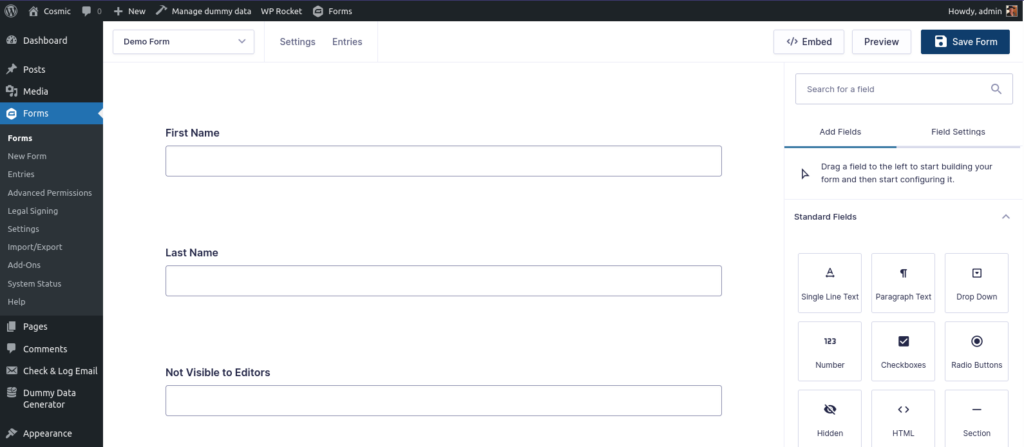
Don’t worry about the “Not Visible to Editors” field for now. I’ll cover this a little later.
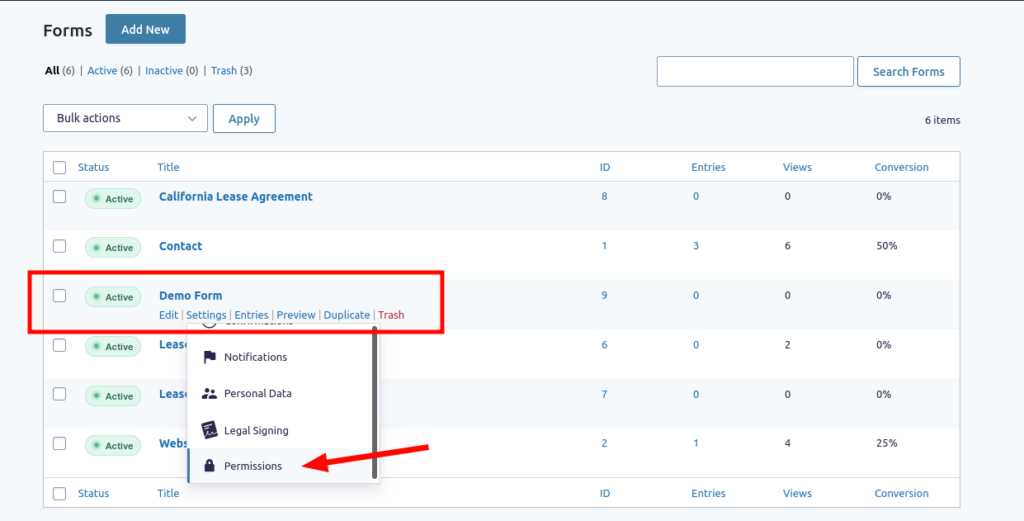
Within the form editor, click on Settings in the top menu bar, then select Permissions from the dropdown. You’ll find yourself in your particular form’s Settings menu for Advanced Permissions. There are two tabs to work with here: Form Permissions and Entry Permissions.
You can also access the Settings menu for individual forms through your list of forms under the Gravity Forms menu.
Let’s start with Form Permissions and add some rules.
Form Permissions
You’ll notice that you have two options for creating Rules: Add Rule by Role and Add Rule by User. They’re similar in function with slight differences.
Add a Rule by Role
We’ll start by adding a Rule by Role. After you click the Add Rule by Role button, you’ll get a drop down with several options.
The first choice you must make for the rule is which role it targets. You can select any role that’s present in WordPress core or any custom role that’s created by a plugin.
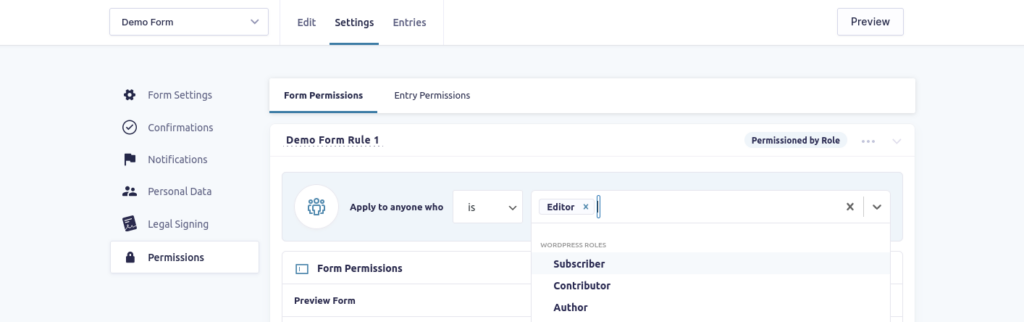
You also have the choice of designating whether the role “is” or “is not,” which gives you more flexibility in creating rules.
An important thing to note is that you can’t choose the Administrator role because Administrators have access to everything by default. So it’s a good idea to have your users and their roles sorted before creating rules for them.
In this example, let’s choose the Editor role. Now we need to decide which permissions are granted or denied to the Editor. There are four permissions tables where you can make your selections:
- Form Permissions
- Entry Permissions
- Entry Notes Permissions
- Add-On Permissions
On the left are listed the capabilities, and on the right are the toggle switches that determine the state for that capability. There are three states possible, and they’re intuitively color-coded:
Grey: Inherited
Blue: Enabled
Red: Disabled
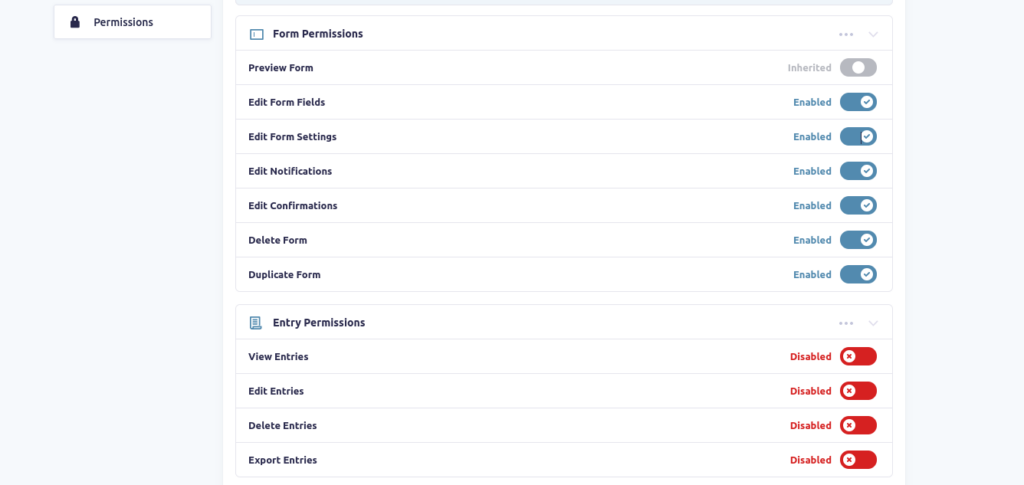
The Enabled and Disabled states are obvious, but what about “Inherited?” Inherited simply means that the capability’s permissions inherit the permissions determined by that user’s role, either directly through WordPress or by using a capability management plugin.
Going back to our specific form’s rules, you can change any default permissions settings by enabling or disabling the switch. Left alone, it will inherit the default.
A handy time-saving feature is the ability to group select permissions. By clicking the three buttons at the top of any table, you can choose to Allow All, Deny All, or Reset Permissions for that capability.
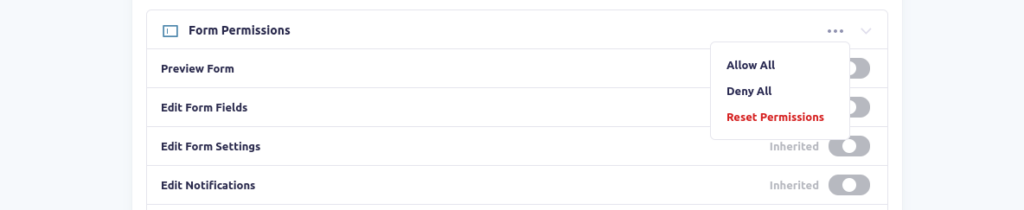
Additionally, you can do this for the entire rule by clicking the three buttons at the very top of your rule menu.
If you want to add additional rules for another role, just click the + Add New Rule button at the bottom of the menu.
Permissions flow downwards in the rule list, so the second rule in the list inherits permissions from the one above. You can easily change the order of the rules you create using drag ‘n drop.

To make things even more efficient when creating multiple rules is the ability to duplicate any existing rule in the list. Just click the 3-dot menu and select Duplicate.
Add a Rule by User
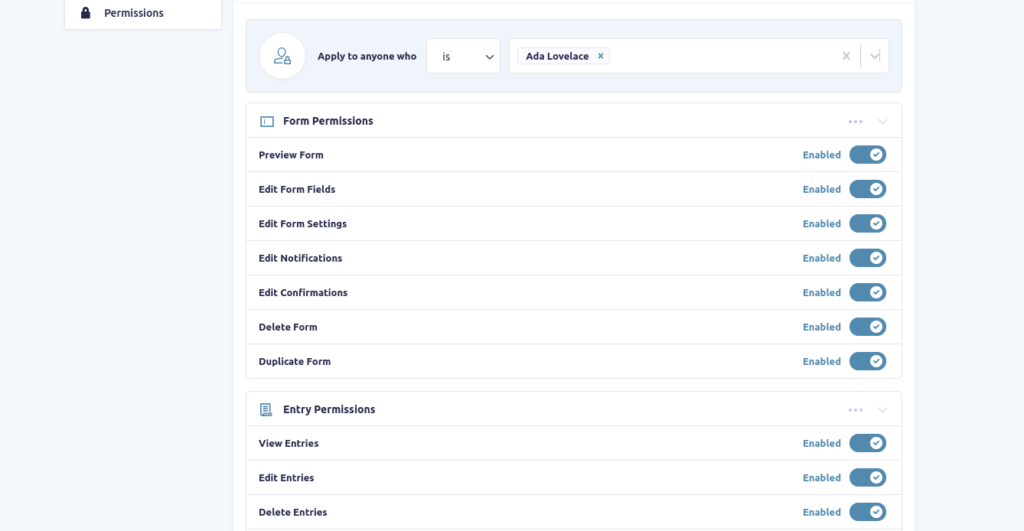
To make your rules even more specific, you can also add rules by user. For example, let’s say you’ve set permissions for the Editor role. However, you have an employee in the Editor role whom you want to have more capabilities than any other Editor.
Click Add New Rule, then Add a Rule by User.
In the same way you chose a role in that menu, you first need to choose a user to whom the rules will apply. Let’s say Ada Lovelace is an Editor who needs all entry permissions, whereas other Editors don’t. Choose Ada from the list of users, then set permissions just as you did in the Roles menu.
Make sure you click Save Form Permissions when you’re done adding and adjusting your rules!
Entry Permissions
With Entry Permissions, you can create rules for who can access any entries that come in on your form. As with Form Permissions, you can add rules by Role or User. Since we previously made a special rule for user Ada, let’s do that with Entry Permissions.
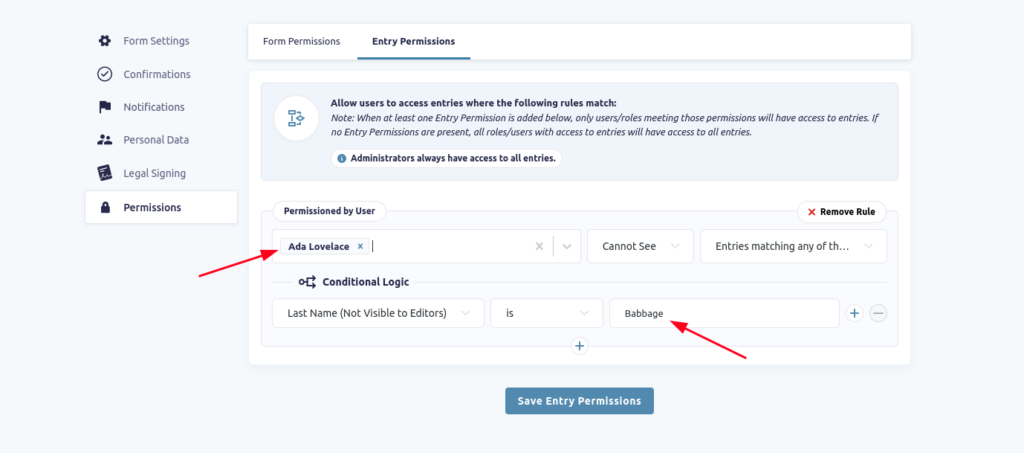
Say you want Ada to be able to view all entries except those made by her friend Charles Babbage (for privacy reasons, let’s imagine). You can do that by using Advanced Permissions’ Conditional Logic.
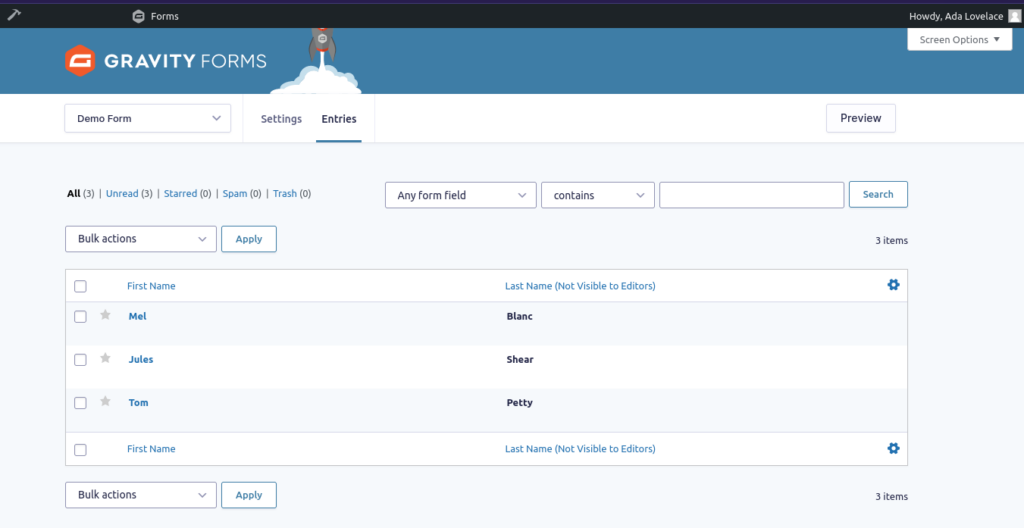
As an Administrator, you can see all entries, always. For example, we can see that Charles Babbage made an entry on our form:

That’s great, but we don’t want Ada Lovelace to see that entry. Under Entry Permissions, we’ll add a new rule and choose Add Rule by User. Select Ada Lovelace as the user. Then we’ll want to choose Cannot See and then change All Entries to Entries matching any of the following rules.
A new menu item, Conditional Logic, appears and gives you multiple choices for matching your desired logic. In our case, we want the field Last Name (Not Visible to Editors) to match the name “Babbage.”
Click Save Entry Permissions. Now, when logged in as Ada Lovelace, we can see that she can view all entries except Charles Babbage:
Using Conditional Logic on Specific Form Fields
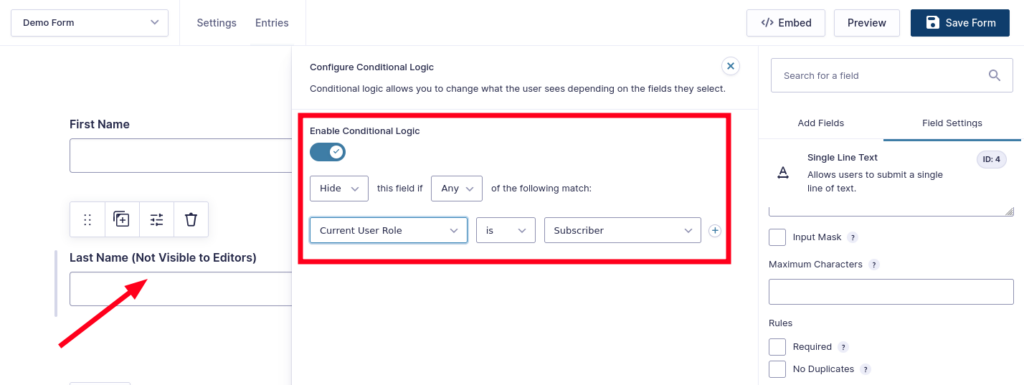
In addition to setting up conditional logic for entry permissions, as I’ve just described, you can also do it within the form on a per-field basis.
For example, maybe you want to hide a specific field from people who are already subscribers to your site. Select the field you want to hide, and scroll down on the right-side tools menu to find Conditional Logic. Click that, and in the pop-up window, select Enable Conditional Logic. You can then set up your conditions as needed.
Conditional logic can also apply to confirmations and notifications. When configured, they’ll only be sent to specific user roles — this works with any Add-On you have installed.
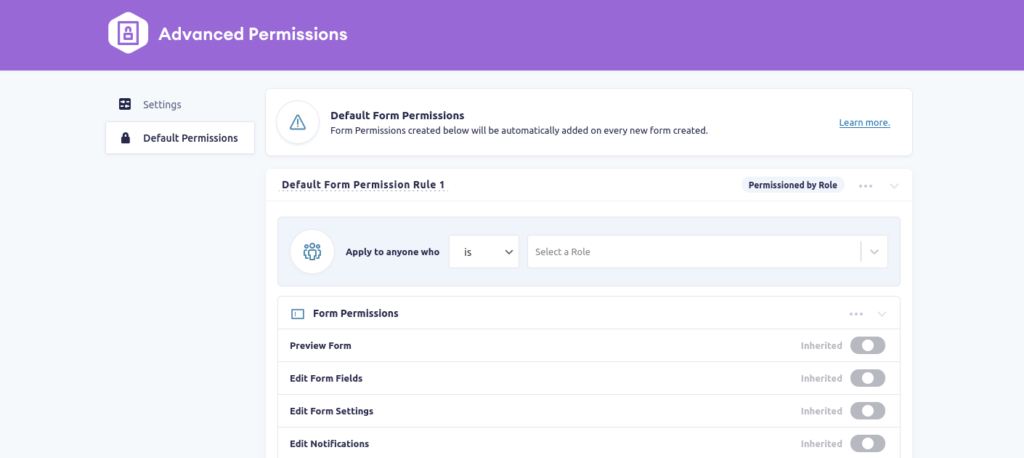
Default Form Permissions
If you create a lot of forms in your organization, you can make the process much more efficient by setting up default permissions.
Under WP Admin → Forms → Advanced Permissions, select the Default Permissions tab. Here you can configure default permissions that will automatically be added to all new forms.
Rules created under Default Permissions do not sync globally. So if you change default permissions or create new ones, they will not retroactively apply to older forms — you’ll need to go back and reconfigure those manually on a per-form basis.
Note that you can also change the name of your rules anywhere you have them. You don’t have to stick with “Default Form Permissions Rule 1”; you can change it to something that makes it easier for your team to find and sort rules — which is helpful if you’ve set up multiple rules.

Granular Control Over Gravity Forms Access
Now you know how to client-proof your Gravity Forms so the right people have access only to what they need. It’s easy to set up, and as an Administrator, you can change permissions at any time. Your Gravity Forms are locked down and have protected access so your clients, staff, or other users don’t see your sensitive data.