Key Takeaways
- GDPR Requirements: Use clear links, plain language, informed consent via unticked checkboxes, and encrypt data.
- Built-in GDPR-compliance Features: Gravity Forms provides some built-in features that help keep your forms compliant.
- Setting up Consent Checkboxes: Add a consent checkbox so the form cannot be submitted unless the user provides consent.
- Built-in WordPress Tools: WordPress provides tools to export and erase personal data.
- Automating Entry Deletion: Automatically remove old Gravity Forms entries using Entry Automation.
- Securing Form Data: Use Advanced Permissions to set highly specific permissions for forms and entries.
On May 25, 2018, the EU Parliament began enforcing the General Data Protection Regulation, or GDPR. What does that mean for you? In this article, I’ll explain how to make your site, specifically your WordPress forms, GDPR-compliant.
Essential GDPR requirements for WordPress forms
What is GDPR, anyway? It’s a law that requires businesses to protect the personal data and privacy of EU citizens for transactions that occur within EU member states and regulates the exportation of personal data outside the EU.
This personal data can include basic information such as a person’s name, email address, location, IP address, cookie data, and more.
Some requirements include:
- A link to a privacy policy that’s present and clear
- All consent is obtained via unticked checkboxes
- Each data use purpose has its own consent checkbox
- Plain language explains why data is collected and how it will be used
- Users are told how to withdraw consent or request deletion
- Data is encrypted in transit and at rest
- Consent records are securely stored and auditable
One recommended way to handle GDPR compliance is not to store personal data in the database. However, this creates potential problems because of the way Gravity Forms handles user-submitted data and how its Add-Ons interact. Not being able to save a form entry to the database can cause multiple issues:
- Files that were uploaded with the entry are immediately lost.
- The User Registration Add-On requires an entry to remain in the database while there is a pending user registration against it.
- If you send the form entry data to a third party upon submission (MailChimp, Help Scout, Agile CRM, etc) and that third party’s API is down, you’ll have no way to recapture that lead once the service is back up and the form entry is not in the database.
- Add-Ons that do asynchronous processing (Dropbox, Webhooks) will be unable to run as the entry they are processing will not exist.
All of these issues sound daunting, but don’t worry! Some integrated features of WordPress and Gravity Forms solve these problems.
Essential forms features for GDPR compliance
Gravity Forms provides some built-in features that help keep your forms compliant, like:
- Gravity Forms includes a “Personal Data” tab in Form Settings, allowing integration with WordPress’s Export and Erase Personal Data tools.
- Admins can select specific fields to be anonymized, enhancing privacy for sensitive data.
- Gravity Forms allows you to prevent the storage of IP addresses.
- Consent checkboxes can be added to forms to ensure users provide explicit permission before submitting personal data.
Let’s go over how to set these up.
Setting up GDPR-compliant consent checkboxes
It’s easy to create a consent checkbox in Gravity Forms. In the form editor, go to the Advanced Fields section and add the Consent field to your form.
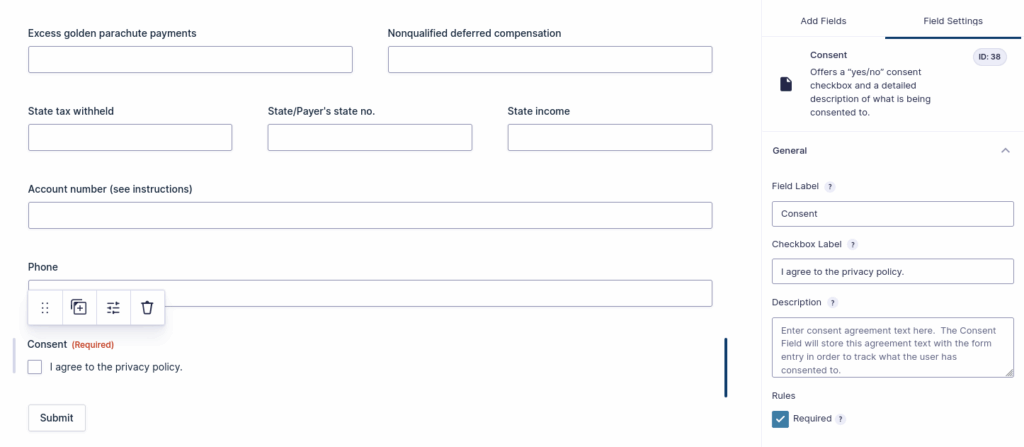
You should customize the field to make it even stronger. First, clearly state what the user consents to in the Label, e.g., “I consent to my data being collected and stored according to the Privacy Policy.”
In the Description, provide a detailed explanation of what the consent covers. For clarity and transparency, you can include HTML, such as a link to your privacy policy.
Lastly, set the consent checkbox as required so the form cannot be submitted unless the user provides consent.
Managing user data rights and access requests
Thankfully, WordPress provides built-in features and recommended practices to help you manage user data rights and respond to access or deletion requests, ensuring compliance with GDPR requirements.
Export Personal Data
WordPress includes a tool to export a user’s personal data. Access this by navigating to the Tools menu in your WordPress dashboard and selecting Export Personal Data. Here, you can process requests from users who want a copy of their data. The system will send an automated confirmation email to the requester. Once confirmed, WordPress generates a downloadable ZIP file containing the user’s data.
Erase Personal Data:
Similarly, you can handle deletion requests by choosing Erase Personal Data under the Tools menu. After confirmation, this process removes the user’s information from your website.
These methods work fine for handling requests manually. But there’s a smarter, more efficient way to manage the data storage aspect of your forms. Let’s automate the process!
Scheduling Automatic Entry Deletion
You can automatically remove old Gravity Forms entries once you no longer need them using an Add-on called Entry Automation. Here are the steps:
Step 1: Install and configure
After installing and activating the Entry Automation for Gravity Forms plugin, go to the Gravity Forms Forms list in the WordPress admin. Hover over the form for which you want to set up automatic entry deletion and click “Entry Automation” in the Settings drop-down.
Step 2: Add a task
You’ll now see the list of Entry Automation tasks set up for your form. Click the “Add New” button to add a new Entry Automation task. On the next screen, enter a name for the task. Set the Entry Type to “Entries” and the Task Type to “Scheduled.”

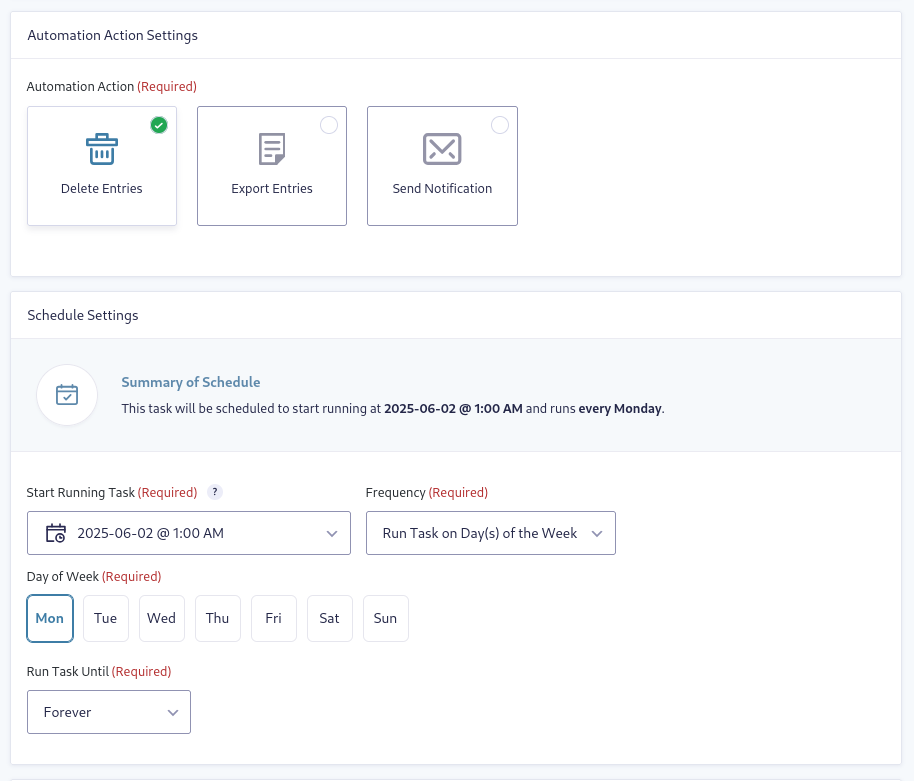
Step 3: Choose an action
Now select the Delete Entries action. Under Start Running Task, click on the underlined date and choose a date and time when you want the task to run for the first time.
Step 4: Schedule the task
Enter how often you want this task to run after the first run time in the Frequency field. If you have the task start running on Monday and want it to run every Monday afterward, set the Run Task Every value to Run Task on Day(s) of the Week.
Step 5: Set the date range
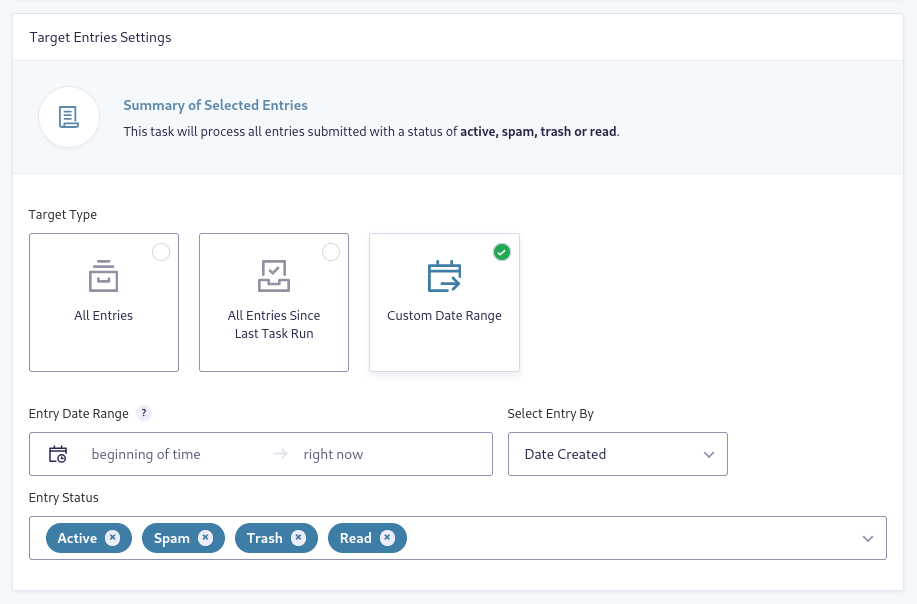
Next, you can decide whether to export All Entries, All Entries Since the Last Task Run, or a Custom Date Range.
If you want to set a Custom Date Range, there are a few more settings to configure.
Under Entry Date Range, both the from and to date range fields are empty by default. When the from field is left empty, all entries since the beginning of time will be selected. When the to field is left empty, all entries up until the time your Entry Automation Task is being run will be selected.
To set a custom date range, you can use plain English phrases like “yesterday” or “1 week ago.” You’ll see a preview at the top relative to the current time set in your WordPress admin.You can also select options for Entry Status, such as Active, Unread, Spam, or Trash.
Step 6: Use conditional logic
You can also use Gravity Forms’ conditional logic feature to be more precise about which entries to delete automatically.
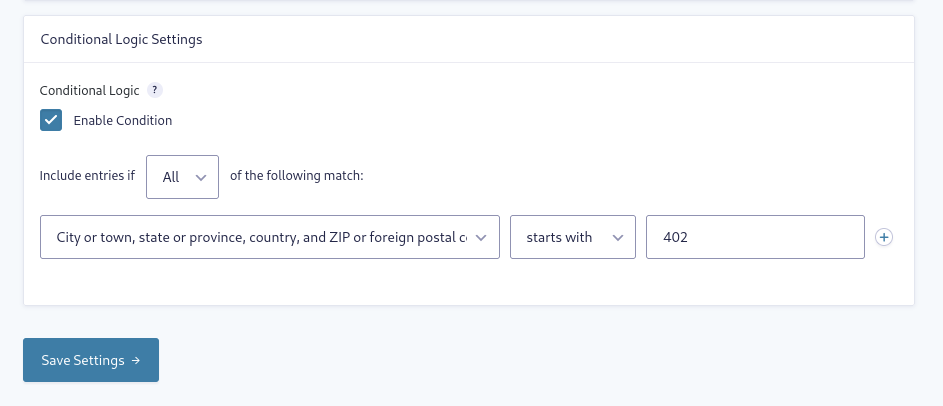
Click the Save Settings button, and you’re done! All of your old form entry data will be automatically removed from your site. This automated setup not only keeps your server clear of unnecessary data, but it also helps your WordPress forms stay GDPR-compliant!
Now let’s cover an additional method for even more granular control over who can view, edit, or export form entries and settings.
Securing form data with Advanced Permissions controls
The Advanced Permissions Add-On allows you to set highly specific permissions for forms and entries. You can control access at the field, entry, and settings level for individual users or user roles, restricting or granting access as needed.
Permissions can be managed from within Gravity Forms. For each form, you can add rules by user or by role, specifying which users or roles can view, edit, or export entries, and manage form settings.
You can set rules such as:
- Allowing only specific departments to view entries relevant to them (e.g., Marketing can see only marketing entries, not tech support).
- Blocking access to sensitive fields or entries for specific users or roles.
- Use conditional logic to refine which entries or fields are accessible based on entry data.
How to Set Up and Use Advanced Permissions
Just as with Entry Automation, configuring Advanced Permissions is simple. First, open the form you want to manage in the Gravity Forms editor. Then, navigate to Settings → Permissions.
Add a rule
In this example, we’ll choose the Entry Permissions tab because we need to address form entries in the database, which directly relates to GDPR requirements.Choose to add a rule by user or by role. Note that Administrators always have access to all entries.
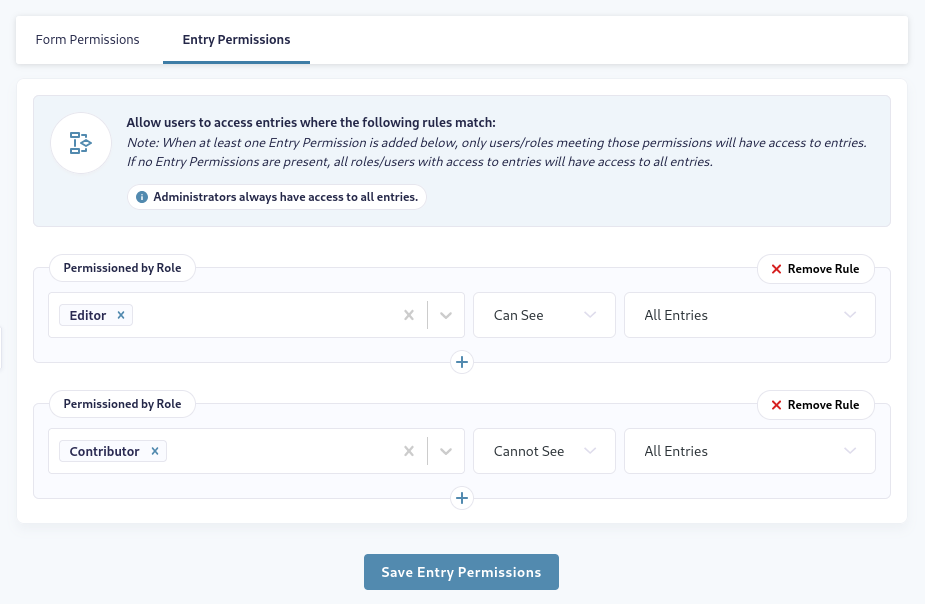
It’s really that simple to configure permissions for form entries! But there’s another aspect of permissions you can set up.
Setting Default Permissions
You’ll need to follow the steps I just outlined to configure permissions for each form. If you have many forms, it may take a while to set up individual permissions for each one. This is where setting default permissions can help. You can create rules that will be automatically applied to each form, which is a handy way of ensuring your forms are covered for GDPR compliance.First, navigate to Forms → Advanced Permissions → Default Permissions. Click Add New Rule. This is just like we did for the individual form earlier.
Under Apply to anyone who, select is from the first drop-down. Select the role you want to manage.
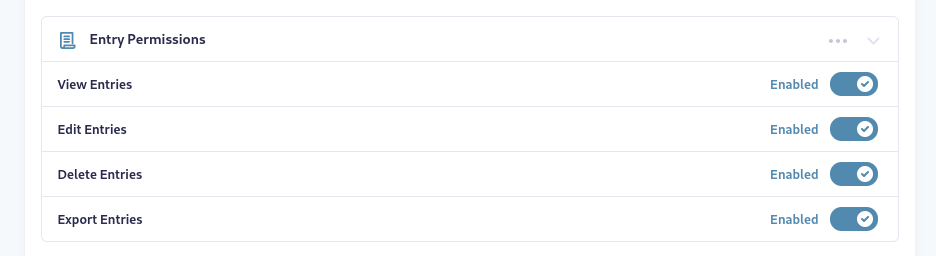
Next, use the toggles to choose the permission for each activity in the list. You have three choices:
- Disable: Prevents the user from performing that function.
- Enable: Allows the user to perform the function.
- Inherit (default): Automatically applies the default permissions for that role in WordPress.
You can enable or disable each permission as needed. You can also set up custom default permissions for each user and user role.
Responding to User Data Access Requests
With permissions set, you can ensure that only authorized users can access or modify user data, which is essential for complying with EU data protection regulations.
To provide a user with their data, you can export entries relevant to them or allow them to view their submissions, depending on your permissions setup.
Start building GDPR-compliant forms today
You can’t avoid storing personal data in the database when you use forms. But with tools like Entry Automation and Advanced Permissions, you can manage that data better than ever, ensuring you have GDPR-compliant WordPress forms.