Streamlining your form submission process can save you time and enhance the user experience. Adding PDF attachments to Gravity Forms emails automates document delivery, making it easier to send receipts, contracts, or even dynamically-generated PDFs. This guide walks you through setting up PDF email attachments, comparing different methods, and optimizing your workflow for efficiency and security.
Key Takeaways
- Automate PDF Attachments: Use Gravity Forms add-ons to automatically attach PDFs to email notifications based on form submissions.
- Dynamic vs. Static PDFs: Choose between dynamically-generated PDFs (personalized for each submission) or pre-uploaded static PDFs (for consistent content like guides or terms).
- Install Add-Ons: Tools like Fillable PDFs or Entry Automation integrate with Gravity Forms for easy setup of PDF generation and attachment.
- Create Templates & Map Fields: Design a PDF template with fillable fields, then map them to form entries for dynamic PDF creation.
- Test & Automate: Ensure PDFs attach properly by testing, and use conditional logic or scheduled tasks for more customized workflows.
Enable PDF Email Attachments for Gravity Forms
PDF attachments offer versatility in managing form submissions, but how do you enable this functionality in Gravity Forms? By leveraging add-ons, you can easily attach PDFs to email notifications.
Here’s a step-by-step look into automating this process to enhance your productivity:
How to automatically add PDF attachments to Gravity Forms emails
Automatically attaching PDFs to Gravity Forms emails is straightforward when you have the right tools. Start by installing a suitable add-on which can integrate PDF delivery directly into your workflow. Additionally, try an add-on that helps you generate PDFs dynamically based on the entries submitted through your form.
Once configured, these tools dynamically generate PDFs from form data upon submission and attach them to email notifications. The result? Streamlined communication, reduced manual effort, and a more professional interaction with your users.
Sound complicated? It doesn’t have to be. While there is a certain amount of set up and configuration you’ll need to do to create your PDF email attachment system, the add-ons give you a leg up so you don’t have to write any code or reinvent the wheel.
In this article, we’ll show you exactly how to set up your automated system. First, we’ll cover the different methods for sourcing your PDF attachments.
PDF attachment options: Generated vs existing file methods
Before we get too far into attaching PDFs, let’s talk about the different source options for them. When setting up PDF attachments, you have two primary options: dynamically generating PDFs or attaching pre-existing files.
Dynamically Generated PDFs
Dynamic PDFs are created using form submission data, offering customization based on user input. For instance, you can generate personalized invoices, certificates, or complex tax forms with add-ons like Fillable PDFs. This method is ideal when each submission requires unique content. A tax form might work like this: When a user enters their freelance income data into your web form, Fillable PDFs will generate an official 1099-MISC suitable for printing and filing — or for use in your CPA firm. With a little set up on your end, it will work automatically, every time.
Advantages:
- Fully customizable based on user input
- Automated creation reduces manual effort
- Professional and personalized communication
Disadvantages:
- Requires configuration of templates and plugins
- May slightly increase server load during generation
While some plugins can increase the load on your server due to the templates being generated locally, Fillable PDFs lets you use your existing forms as templates. This eliminates any increase in server load, as generation is handled by CosmicGiant’s remote servers. This also reduces the cost and makes the process more efficient for you and your team. The Fillable PDFs add-on is built to work with Gravity Forms, so the UI will be very familiar. The generated PDFs are stored locally and you can send them to your team and customers automatically or allow users easy access to them with download links that can be shared with anyone.
Pre-Existing PDFs
The second option is to attach a static, pre-uploaded PDF to every form submission email. This approach is ideal for documents like user guides, terms of service, or brochures.
Advantages:
- No add-ons needed
- No impact on server performance
- Consistent content for every recipient
Disadvantages:
- Lack of personalization
- Limited to static content — no dynamic population from your forms.
Of course, you should choose the method that best suits your workflow and user needs. Now that you understand your available options, let’s go over how to accomplish them.
Setting up dynamic PDF generation for form submissions
The good news is that you don’t need a computer science degree or even know how to code to set up dynamic PDF generation. It requires careful setup to ensure accuracy and consistency, but using an add-on will make things much easier.
Here’s a step-by-step guide:
Install a PDF Generation Add-on
Start with a tool like Fillable PDFs, a certified add-on that integrates seamlessly with Gravity Forms. It allows users easy access to generated PDFs with download links you can share with anyone. Or, use the Fillable PDFs Gutenberg block to display a user’s generated PDFs on any page. You can even attach PDFs to notifications.
Design Your PDF Template
Use Word, Pages, LibreOffice or any word-processing app to create a template that includes fillable fields (e.g., names, dates, or responses). Export to PDF. If you already have a PDF, Adobe Acrobat will help you create a fillable form. The most important thing is that your PDF contains a fillable field for every entry field on your form created in Gravity Forms.
Create Your Form
There are actually two approaches you can take with your form. One, you can create your form in advance and design your PDF template around it. Alternatively, you can do the reverse and design your form to match the fields in your existing PDF. It entirely depends on your preference and individual situation. Whichever you choose, your form needs to be created before moving on to the next step.
Map Your Form Fields to Your PDF Template
Once your template is ready, you can import it into Fillable PDFs. Then you’ll create what’s called a feed to begin mapping the fillable fields to your form.
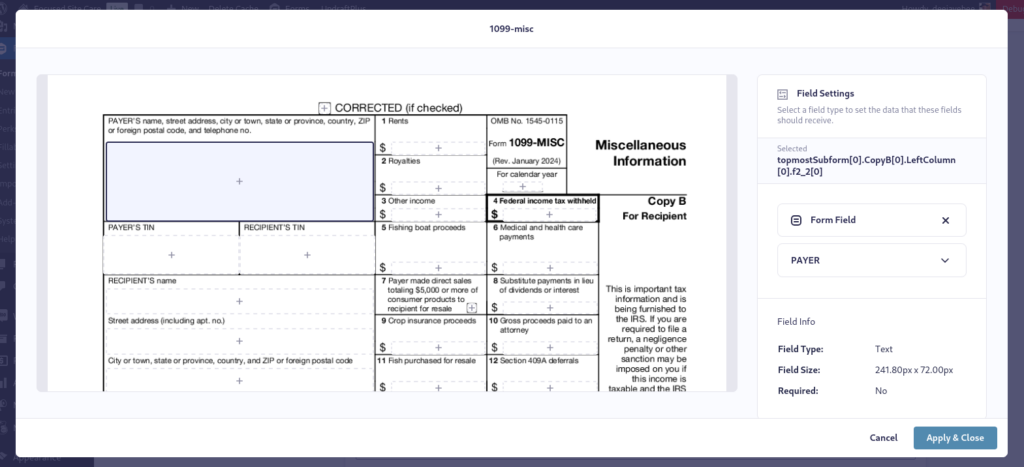
In Fillable PDFs, mapping the fields is super easy. Your PDF will appear in the modal window, with a menu on the right. Simply click on a field in your PDF and then select the corresponding form field in the right-side menu. After you finish mapping the fields, save your settings.
In this section, you’ll also choose which notifications the generated PDF will be attached to.
There are advanced settings that allow you to control access to the generated PDF, which we’ll cover later in this post.
Test Your Workflow
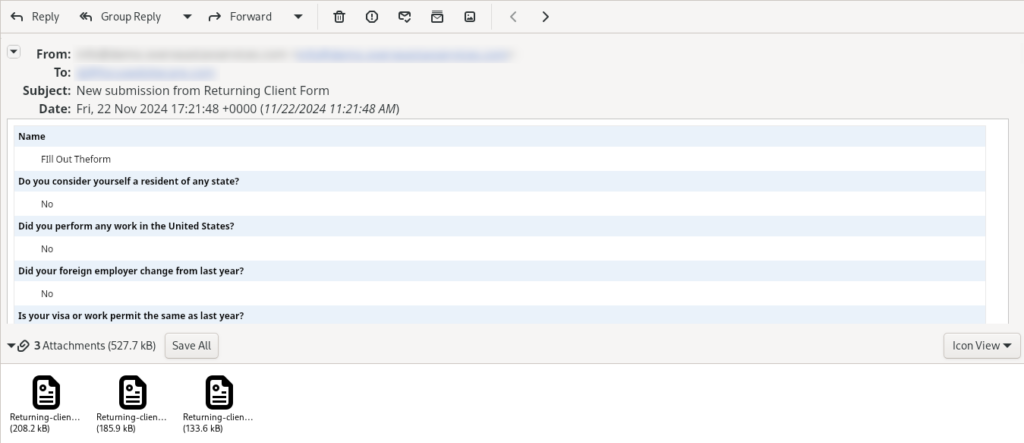
Submit test forms to ensure the PDFs generate and attach correctly. The PDF will be attached to an email that also displays the form entries as completed by the user.
Pro Tip: Use conditional logic to create variations of PDFs based on specific user responses.
Attaching PDF files with Gravity Forms
When thinking about different methods for attaching PDF files, it’s important to nail down your desired result.
There are a few ways you can attach a PDF using Gravity Forms:
- Set up a notification with a link to a file
- Attach a PDF of dynamically-populated form entries
- Attach a dynamically-generated PDF using your template
The Notification Method
This method is the simplest, and works with Gravity Forms out of the box. It’s especially useful for sharing terms and conditions or other non-dynamic documents. For example, you could offer a free educational PDF as a lead to get email subscribers.
To attach a pre-existing PDF, upload your file to your WordPress Media Library or a secure server. Then, in the Gravity Forms email notification settings, simply link the file in the attachment field.
PDF From Form Entries
Start by installing the Entry Automation add-on. More than just an alternate method for creating PDF email attachments, Entry Automation saves you time by simplifying common tasks in Gravity Forms. You can export form entries, delete specific entry data, and send reminder notifications with ease.
Once it’s activated, the steps to automation are easy.
Select your form and navigate to Settings → Entry Automation. Click the button to add an Entry Automation Task (also called a “Feed”).
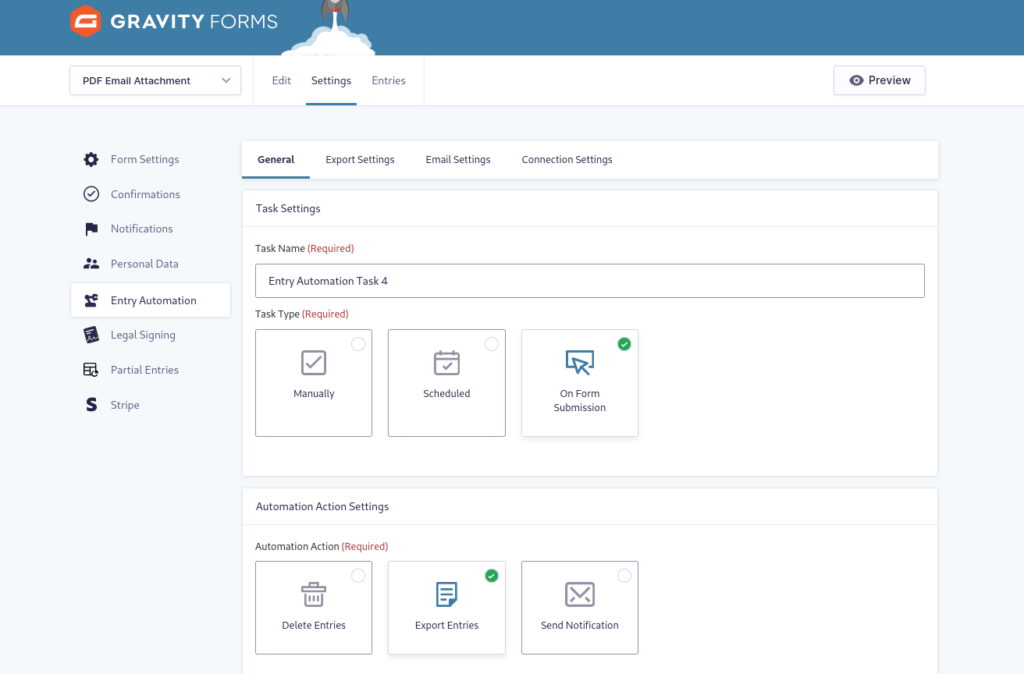
Choose from the three Task Types; Manually, Scheduled, or On Form Submission. This will determine how the Task will be triggered to run. For example, you can configure scheduled tasks to run on a customized schedule that you set up in advance.
Then select which action the Task should perform:
- Delete Entries
- Export Entries
- Send Notification
To attach a dynamically-generated PDF to an email, you’ll want to Export Entries.
Now, under the Export Settings tab, choose PDF from the available file types. Then fill in the export file name field using plain text or the handy merge tags. In Field Selection Settings, select all the form fields you want included in the PDF.
Move to the Email Settings tab and toggle Email Generated Export File.
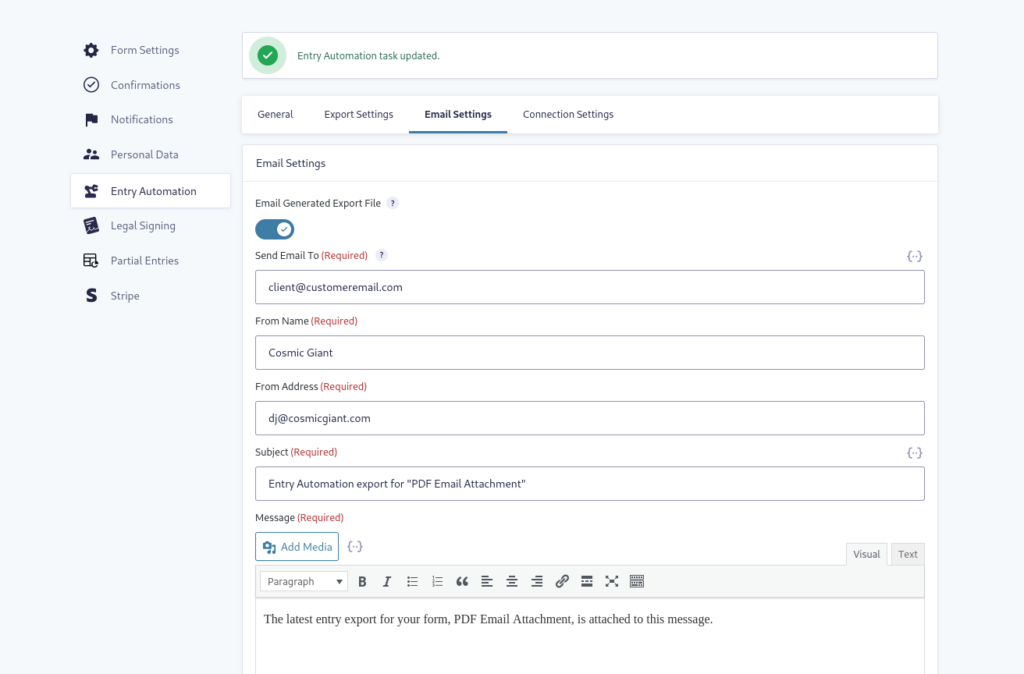
Complete the fields to configure where the email will be sent and which email address it will come from. You can also customize the message, just like a Gravity Forms notification.
Additionally, Entry Automation allows you to automatically generate a zip file that includes the form entries PDF plus any uploaded documents in your form.
Dynamically-generated PDF using your template
Using Fillable PDFs as described earlier, attaching a PDF is a simple matter of setting up a notification. The populated template will be sent via email in PDF format. Easy!
Optimizing PDF attachments: Security and performance
Creating PDF email attachments can introduce security and performance challenges. Here’s how to address them.
Secure File Access
As mentioned earlier, when you use Fillable PDFs, you have full control over who has access to your generated PDF files.
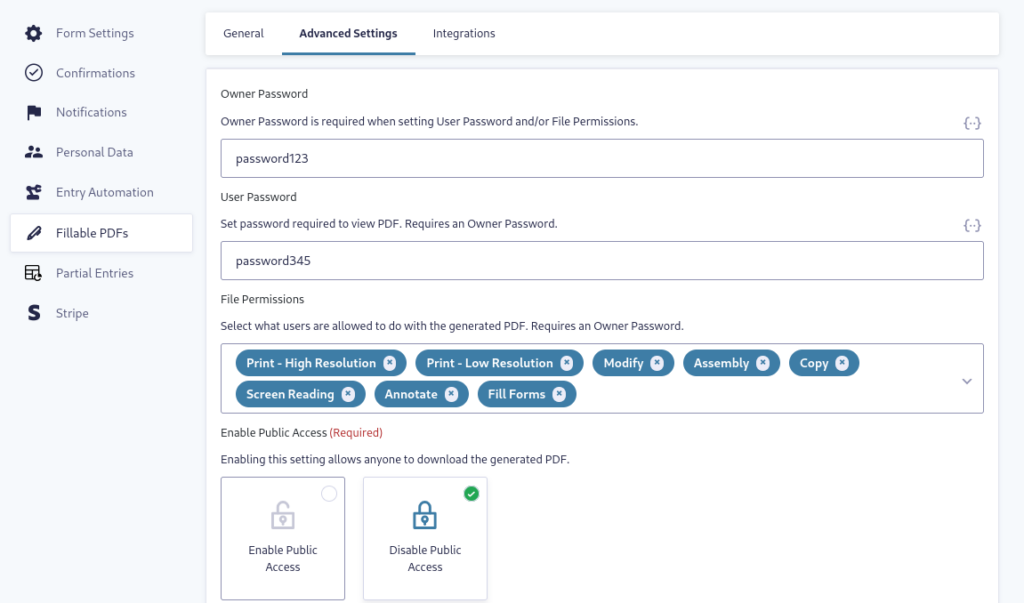
By adding passwords and configuring which functions users can perform with generated PDFs, you can set up a system for secure access. Depending on your choices, you can allow users to:
- Print high res
- Print low res
- Modify
- Assemble
- Copy
- Allow for screen reading
- Annotate
- Fill Forms
Of course, you can also enable your PDFs to allow anyone to download them. It’s your preference.
Minimize Server Load
You don’t want your site to get bogged down by running too many processes on your server. That’s why Fillable PDFs eliminates that worry. First, you’re uploading your own templates rather than using the server to generate them. Second, any processing is done on CosmicGiant’s remote servers, which lightens the load considerably.
Encrypt PDFs
For sensitive data, consider password-protecting the PDF files. If you’re linking to static PDFs on your server or elsewhere, you may want to take the time to password protect them prior to upload. You can also set up an additional notification to share the password, so only those who are purposefully given access can see it.
Thankfully, encryption can easily be accomplished in Fillable PDFs. As we covered earlier, the User Password setting allows you to password encrypt a generated document, requiring the user to enter the configured password to open it.
Monitor Email Deliverability
Large attachments can trigger spam filters. Compress PDFs to keep them lightweight. Other things to keep in mind to make emails more deliverable are:
- Avoid using all caps, multiple exclamation points, and emojis in your subject lines. This can trigger spam filters.
- Don’t use a third-party email as the sender. This can cause issues with WordPress’s SMTP, so emails may not get sent. Rather, use an email address that includes the domain of your website.
- Encourage your users to add your email address to their address book.
Setting up conditional PDF attachments
Conditional attachments allow you to send specific PDFs based on user responses. This feature is handy for multi-purpose forms catering to diverse user needs.
If you don’t know about using Conditional Logic in Gravity Forms, here’s a short primer.
Conditional logic in Gravity Forms is a feature that allows form fields to dynamically display or hide based on user input or other conditions. This functionality enables the creation of interactive and personalized forms that adapt to the user’s responses, enhancing the user experience by only showing relevant fields.
How Conditional Logic Works
- Basic Functionality: Conditional logic operates on an “if this, then that” basis. For instance, you can configure a form to show additional fields only if a user selects a specific option from a dropdown menu.
- Field Configuration: To apply conditional logic, you need to enable it in the field settings. This involves setting conditions based on the values of other fields. For example, you might want a set of checkboxes to appear only if a user answers “YES” to a preceding question.
Here’s an example of using conditional logic with your PDF email attachments with Entry Automation. Let’s say you want a colleague to handle only entries that come in from Delaware. First, make sure you have a field for U.S. States on your form and make it a required field.
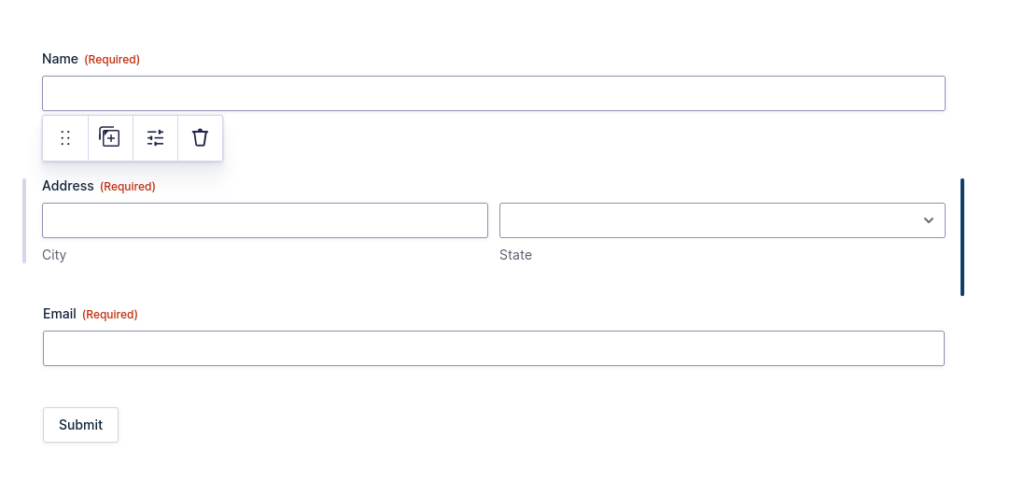
Then, set up a specific Entry Automation Task for that colleague.
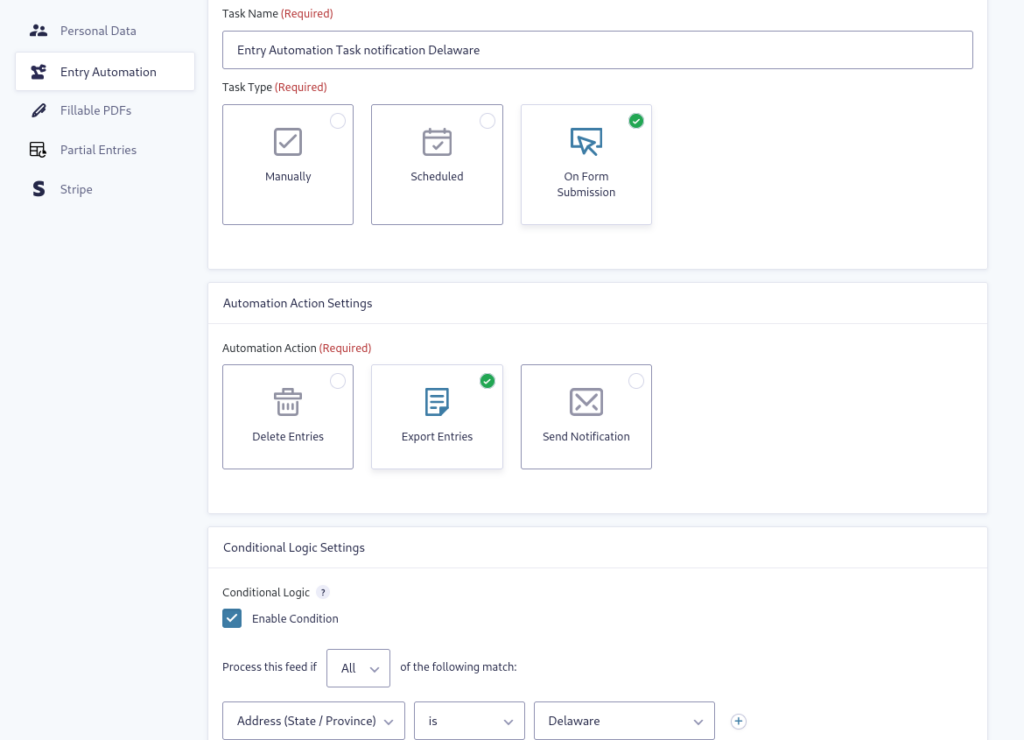
- Set the Automation Action to Export Entries.
- Enable Conditional Logic.
- Set it to process only if the Address (State/Province) is Delaware.
That’s it! There are thousands of ways you can configure conditional logic to send PDF email attachments. With Entry Automation, you can create as many tasks as you need to control your workflow.
Start Automating Your Form-to-PDF Workflow Today
With certain add-ons, you can seamlessly create PDF email attachments in Gravity Forms. Whether you’re dynamically generating PDFs from entry data or using previously-uploaded files, the setup we’ve outlined here will simplify your workflow, enhance user experience, and save valuable time.
Entry Automation helps you create powerful processes that can run on their own with minimal maintenance. Using an add-on like this massively boosts the power of Gravity Forms. Plus, it’s intuitive to use and you don’t need to learn an entirely new way to create forms. The two-pronged strategy of using Fillable PDFs and Entry Automation together can turn a typical web form into a robust system for collecting, organizing, and delivering entry data.
Creating PDF email attachments in Gravity Forms can be much easier than you imagine. Try this setup and watch your form submissions transform into professional, automated email workflows in minutes.

