Key Takeaways
- Create a Gravity Forms Quiz: Start by using Gravity Forms’ Quiz Add-on.
- Scoring: Add scoring to enhance the user experience.
- Quiz results: How to view and analyze quiz results.
- Notifications: Send custom notifications to the user on Pass or Fail.
- Generate a Quiz Certificate: Use Fillable PDFs to generate a personalized certificate.
Did you know that adding a Gravity Forms quiz can boost your site’s marketing and SEO? Adding a quiz to your site is a fun way to get users interacting. That means they’ll stick around longer, which is great for SEO. If you take that a step further and send them a personalized certificate after the quiz, the marketing possibilities are endless! Follow along and I’ll show you exactly how to do it.
How to Create a Gravity Forms Quiz
Gravity Forms offers many add-ons that help you extend the functionality of your forms, such as creating a help desk system or running surveys. Likewise, they also give you a leg up on creating multiple-choice quizzes for your website.
First, you’ll need to install the Gravity Forms Quiz Add-on. Once you do that, create a blank form. Add fields for Name and Email — these will be important for generating a personal certificate later on.
Step 1: Build your Gravity Forms quiz
You’ll notice there’s now a Quiz field available in the Add Fields menu under Advanced Fields. Drag that into your form.
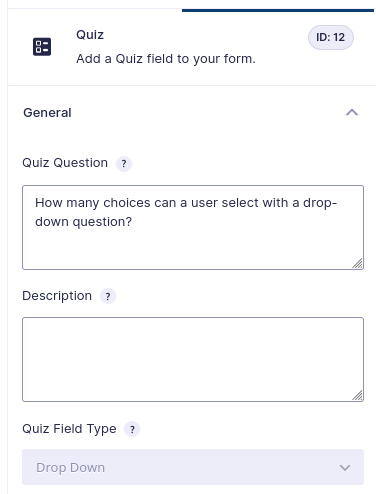
There are three multiple-choice question types you can use:
- Drop Down
- Radio Buttons
- Checkboxes
The difference is that with Drop Down and Radio Buttons, users can only mark a single answer. Checkboxes allow them to tick more than one.
For each question type there’s an option to Edit Choices, which is where you’ll list all possible answers to your question. You can add as many as you like.
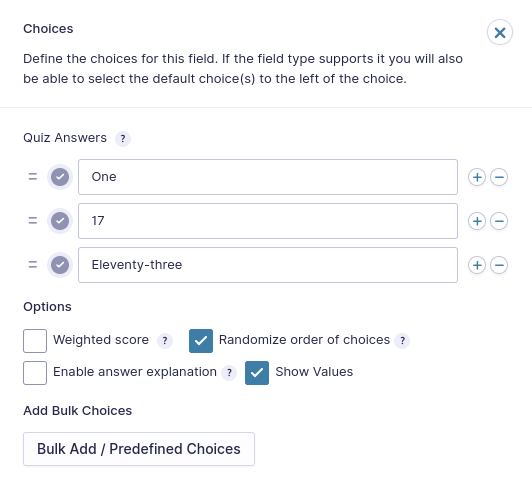
You also need to select the checkbox icon next to the correct answer, which makes scoring possible. Other options under the Choices menu are:
- Weighted Score (allows for a more complex scoring system)
- Randomize order of choices (this only occurs for the user, the results order remains the same)
- Enable answer explanation (displays your explanation for the correct answer on the front end’s quiz results)
Step 2: Scoring your Gravity Forms quiz
Now that your quiz form is built, it’s time to set up the scoring. In your form, navigate to Settings → Quiz.
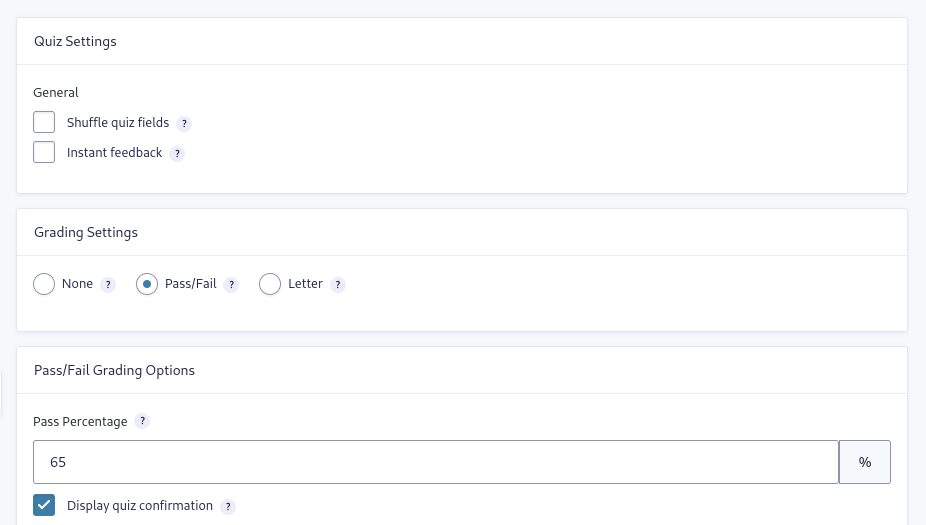
In this menu you can choose whether you want:
- No scoring
- Pass/Fail (based on a percentage you determine)
- Letter Grade (customizable)
A nice feature is Instant Feedback. Enabling this displays the correct answer plus explanation (if you created one) immediately after selecting an answer. Additionally, you can shuffle the quiz questions — which doesn’t affect the rest of your form fields.
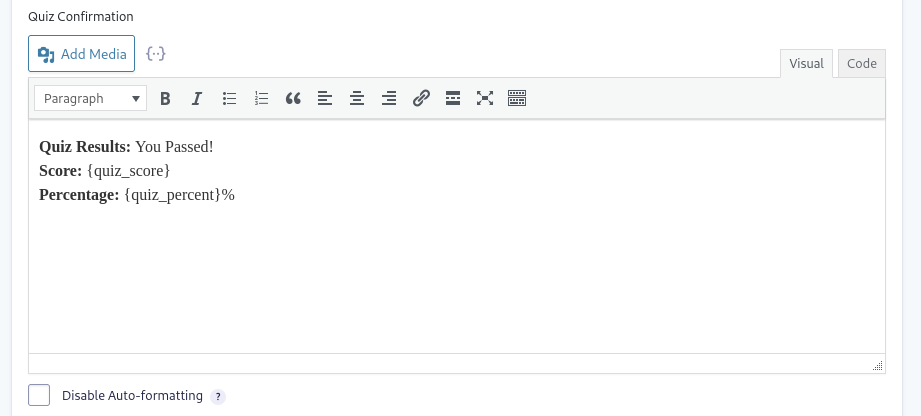
If you decide to use scoring on your form, you can use the default message, or customize it however you like.
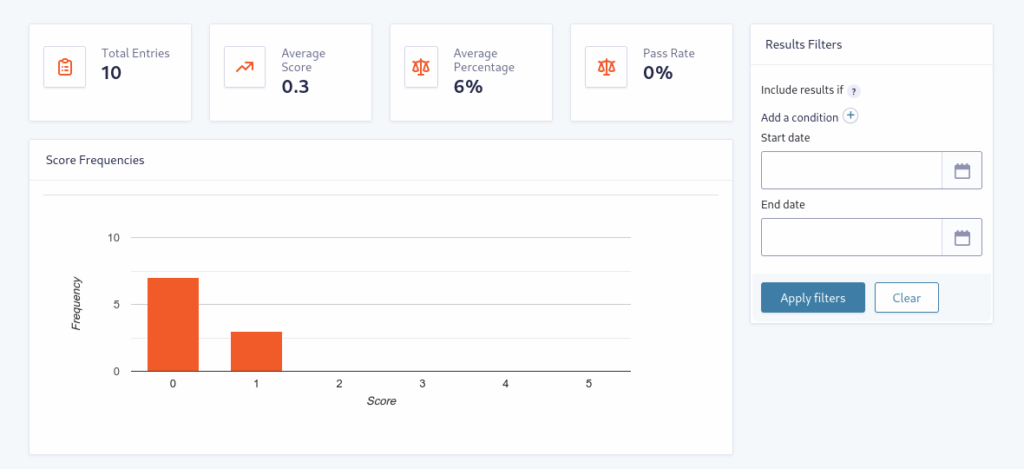
Step 3: Viewing your quiz results
Once quizzes start being submitted, you can check the results data right from the Quiz form. Click Quiz Results in the top menu and you’ll have a nicely charted view of submissions.
Step 4: Sending notifications
You can create unique and customized notifications, just like with any other form in Gravity Forms. This is especially helpful for quizzes, because you can send the results right to the user’s inbox — populated with their individual results! Here’s how to set one up for a user who has passed a pass/fail type quiz:
- In your form, navigate to Settings→Notifications.
- Click to add a new notification.
- Give your notification a name, like User: PASS.
- In the Send To field, tick Select a Field and choose Email from the drop-down list below it.
- Fill the other From and To fields as needed.
- Under subject, you can insert a handy merge tag for the quiz, like {quiz_passfail}.
- Do the same in the message body, inserting any merge tags for name and any quiz results you want to include.
Tick Enable Conditional Logic. Select Quiz Pass/Fail, is, and Pass.

Save your settings. That’s it! If you want to create a unique notification for a user who fails, repeat the steps above and replace the merge tags and conditional logic settings with the appropriate ones.
Now you have a full functional Gravity Forms quiz on your WordPress site! Which is great, but to give something extra to your users, you should send them a nice-looking certificate as a reward. Here’s how to do it.
Generating the Quiz Certificate
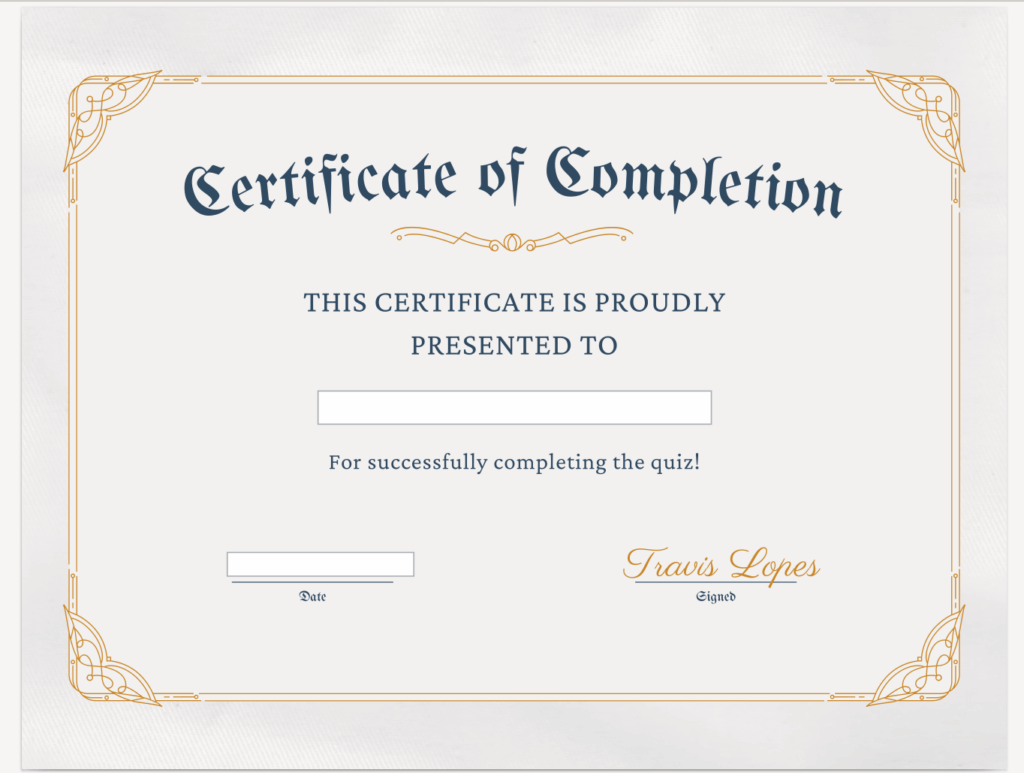
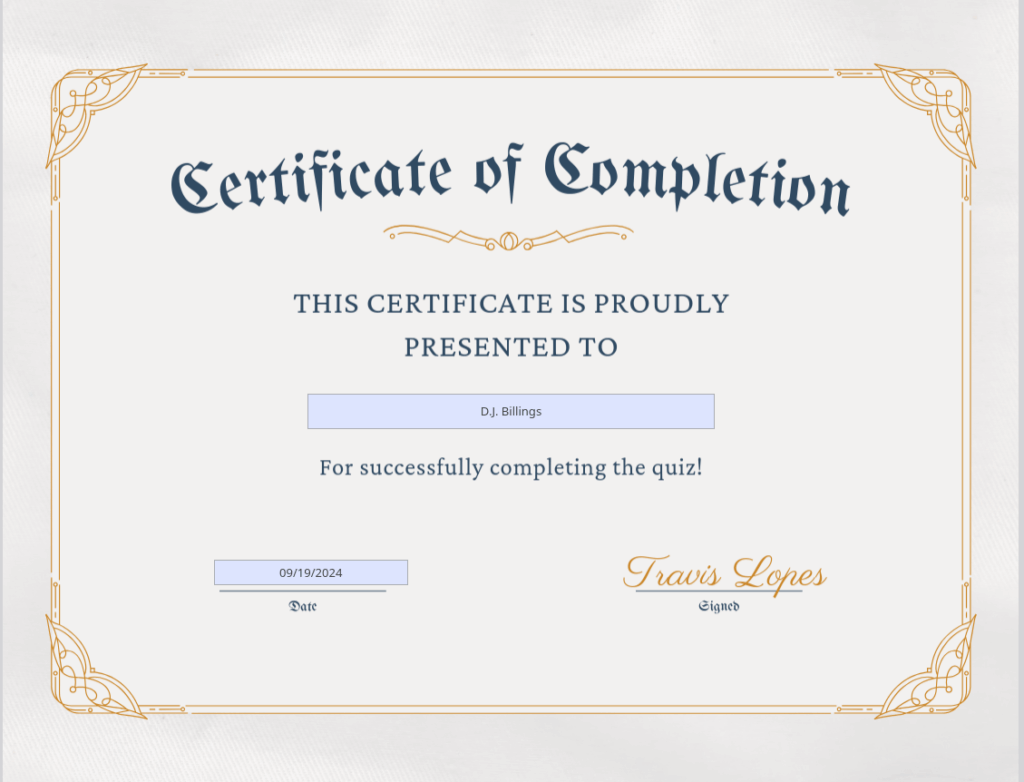
The first thing you need to do is create a certificate template. You can create your own using an app like Word, Photoshop, Illustrator, Inkscape, or even Canva. Whatever method you use, make sure to include fillable fields for name, date, and any other form fields you’ll want populated on the certificate. It’s helpful to label each fillable field distinctly, to make later steps easier. Export your certificate design as a fillable PDF.
With your PDF ready, head back to WordPress.
Use Fillable PDFs to generate your certificates
While you can build a great quiz in Gravity Forms, you’ll need another tool to help you generate the certificate. Fillable PDFs is the best tool for the job. It integrates seamlessly with Gravity Forms and is not only helpful for quizzes, it allows you to generate PDFs from any form you create. Grab the add-on, install, and activate.
Create a Template
To generate the certificate that looks exactly how you want, you’ll upload the certificate PDF you created earlier.
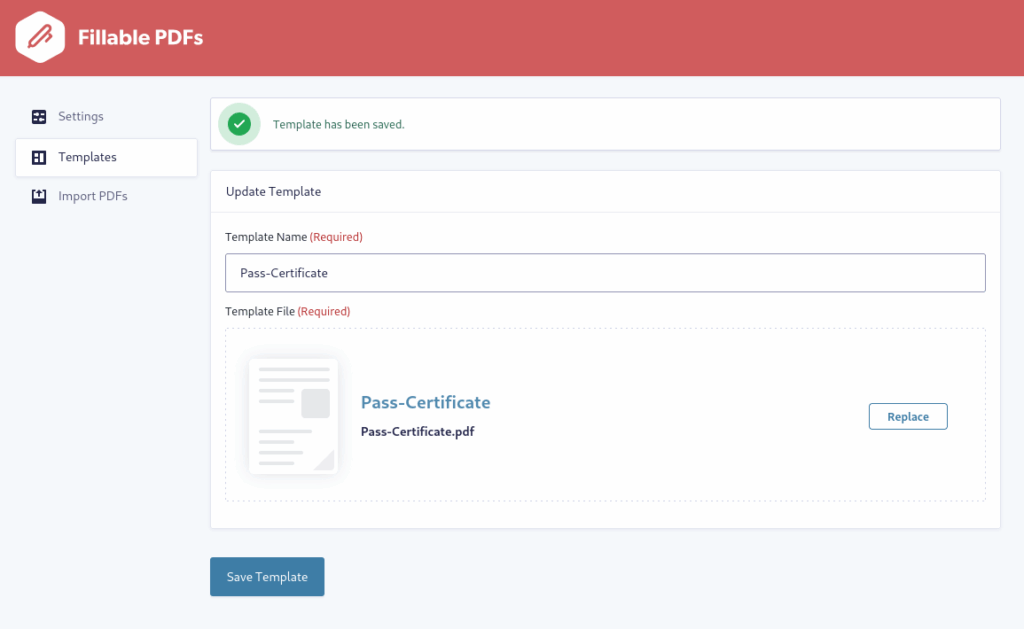
- Navigate to Forms → Fillable PDFs → Templates in your WordPress Admin menu.
- Click the button to add a new template.
- Give your template a name, then drag in or click to add your PDF.
- Click Create Template to save it.
Add a Feed
Now, hop back over to your quiz form and select Settings → Fillable PDFs. Here, you’re going to create a Feed to map the fields in your form to your certificate PDF.
- Click Add Feed.
- In the next menu, give your feed a unique name.
- Select the PDF template you created in the last steps.
- Click Map Fields. In the modal window that opens, select a field in the PDF of the left.
- On the right, choose the field on your form that corresponds to the field in the PDF.
- When you’ve mapped your fields, click Apply & Close.
After mapping, fill in an output file name — whatever makes sense to you.
Then, select which notifications the certificate PDF will be attached to. In this instance we only want to issue a certificate if a user passes, so you would choose that option from the drop-down list. Use Conditional Logic so that the PDF will only be enabled if the Quiz Pass/Fail is Pass.
That’s all there is to generating a PDF certificate for your quiz form! When your user completes the quiz, the blank fields on your certificate template will be dynamically populated like magic.
But what if you want to limit access to the certificate to only the recipient? Let’s go through the steps to do that.
Set Permissions
While still in the Fillable PDFs settings for the form, move to the Advanced Settings tab. In this section, you can see that there’s a File Permissions dropdown. In the dropdown, you can set permissions for certain tasks for the PDF, like printing, copying, modifying, annotating, and more.
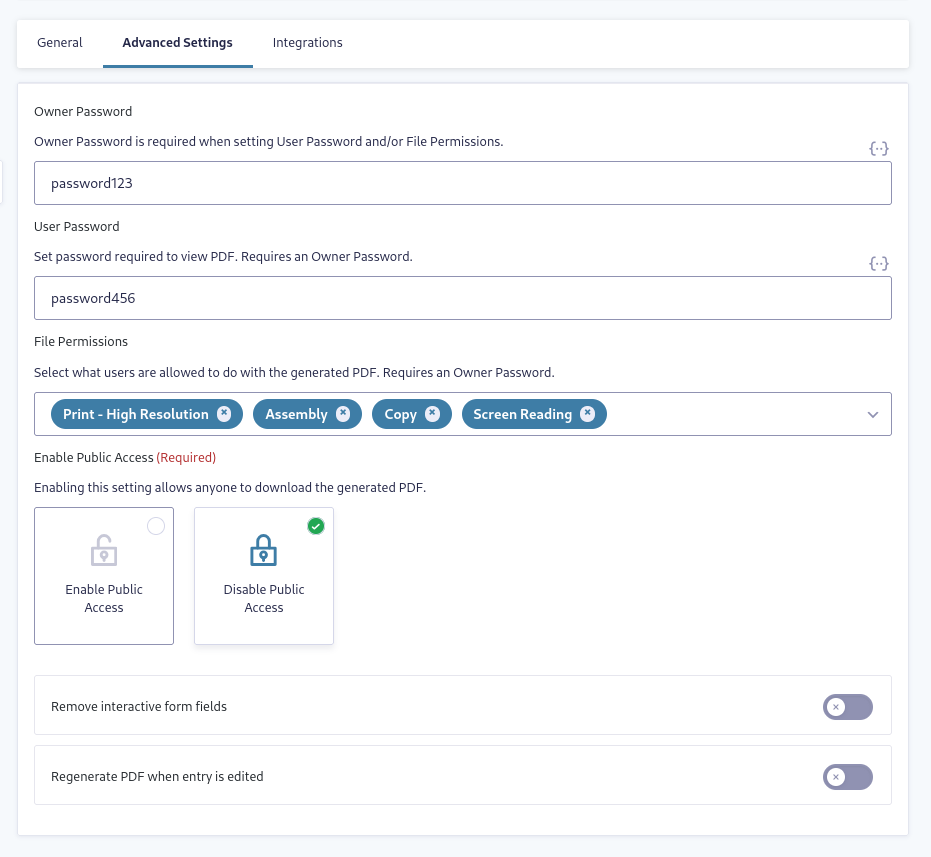
To activate the File Permissions, you’ll need to enter a password in the Owner field at the top.
If you’d like to limit viewing or downloading of the PDF certificate, there are two areas to enable the functionality.
User Password
If you enter a User Password, then the PDF will require a password upon opening to view it.
Enable/Disable Public Access
When you select Disable Public Access, then only Admins and the logged-in user who completed the quiz will be able to access the PDF.
Configuring these Advanced Settings isn’t necessary to generate PDF certificates for your quiz, but they do help keep your files more secure.
Boosting the power of the Gravity Forms Quiz
Now that you know how to take your Gravity Forms quiz to the next level, think about how you can integrate certificates with your marketing efforts. For example, you can add CTAs to your quiz notifications, encouraging users to spend more time on your site. Or, send them to another fun quiz. It’s hard for users to resist a quick survey or quiz. The sky’s the limit!
Try Fillable PDFs and see what else you can do with PDF generation!