Whether you’re running an online store or have a simple online web presence for your business, your website is your brand, and often the first contact you’ll have with potential customers. For this reason, it’s important to pay attention to website security.
By taking the right security measures, you can rest assured that your customer’s information (names, IP address, email addresses, and credit card information) and sensitive data is safe from data breaches and malware. This builds trust and fosters better customer relationships.
In this article, we’ll take a closer look at some of the security vulnerabilities surrounding web forms. We’ll also walk you through a step-by-step tutorial on how you can use the Advanced Permissions plugin to boost Gravity Forms security.
Why You Need Secure Gravity Forms
Businesses use web forms in all sorts of different ways:
- Accept user-generated content
- Lead generation
- Checkout forms
- Business information
- Event registration
- Contact forms
For example, if you use Gravity Forms for private business information, then you would benefit from using a plugin that gives you better control over who can access your forms’ settings and form fields. You can decide who gets to manage the form, its settings, Gravity Forms entries, and entry notes. This allows business owners to publish forms in a secure way. It also ensures that you keep payment information secure (for example, payments made through Stripe or PayPal). Keep in mind that this doesn’t affect who is allowed to fill out the form from the front-end. To prevent unwanted spam entries, we recommend installing One-Time Password.
Let’s say you’re managing a university website and need a way for students to be able to register their own user accounts. Using Advanced Permissions, you might set things up in a way that everyone with a Teaching Assistant user role can preview the form and view entries, but can’t delete the form or the form data (entries).
And if you’re a web designer or developer, you can supercharge Gravity Forms security on client sites so that they don’t accidentally break their site’s form workflow or modify form fields. The easiest way to do this is by creating a rule targeted specifically at the site owners (i.e., your clients) using the Rule Type: User. This lets you disable any capabilities that could potentially modify the form, such as Edit Form or Delete Form.
When it comes to Gravity Forms security, Advanced Permissions is the most robust plugin out there. It gives you complete access management control (including exclusive security permissions), making it easy for you to run your business without worrying about security risks.
Security Issues and Best Practices with Gravity Forms
Hackers and spammers use web forms to find vulnerabilities in your WordPress website. Once they find a security vulnerability, they can use it to infect other websites on your server, break your site’s functionality, create hidden pages, or send spam messages.
If you’re using Gravity Forms on your WordPress site, you need to make sure you’re installing it in a safe and secure way. The first step is to make sure you’ve locked down the security on your hosting server and WordPress website. For this, make sure you’re:
- Running the latest version of PHP on your web server
- Forcing HTTPS/SSL on all website pages
- Taking regular backups
- Following documentation on hardening WordPress
The great thing about Gravity Forms is that it offers several security features out of the box. These include automatic (and background) updates, user permissions, anti-spam protection and captchas, and required login. Gravity Forms issues specific documentation on how to use its APIs to protect, validate, or sanitize input/output data in HTML, URLs, HTTP headers, and when working within the file system. In addition to this, there are also specific features for file upload security and surrounding XSS (Cross Site Scripting) to allow validation across multiple sites.
Once you’ve taken care of your core vulnerabilities, you then need to consider how to secure Gravity Forms’ functionality. Gravity Forms gives you the option to grant access to users without giving them permission to perform various functions. This way, you can assign users only the capabilities they need for their specific user roles.
Similarly, you can configure Gravity Forms’ file upload field security to limit the feature to logged-in users only. You can also specify which file extensions are allowed and change the upload path (uploaded files are stored in wp-content/uploads by default).
Be sure to check out the Gravity Forms Security Best Practices document for details on how to adjust these features.
How to Use Advanced Permissions to Boost Gravity Forms Security
The Advanced Permissions plugin from CosmicGiant lets you define granular permissions to Gravity Forms on a per-form basis. It also gives you access to exclusive form settings capabilities that make it easy to control who can edit form fields, settings, notifications, and confirmations.
You can define multiple rulesets for who can access individual forms and their submitted entries either by specific WordPress user roles or specific users. Once you’ve targeted the users, you can set access for each available capability: inherit, enable, or disable.
This is particularly useful for enterprise users and agencies that need a way to client-proof their forms. Advanced Permissions allows them to prevent users from changing Gravity Forms’ settings that could potentially break the user flow. This is great for all sorts of forms you might have on your WordPress site, including contact forms.
Assuming you already have a WordPress website with the latest Gravity Forms version installed, here’s what you need to do to boost your Gravity Forms security.
1. Install and Activate Advanced Permissions
Purchase the Advanced Permissions plugin and install it on your WordPress website. Click the Activate button to proceed. Next, head over to Forms → Settings → Advanced Permissions to activate the WordPress plugin license.
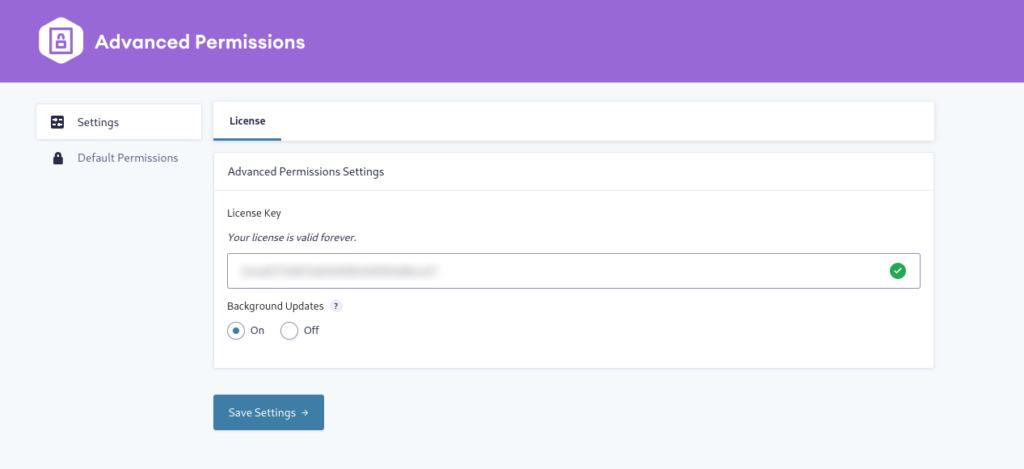
Click the Save Settings button to proceed.
2. Select a Rule Type and Rule Target
Assuming you’ve already created your Gravity Form, start by opening up the form you want to secure in the form builder. Next, go to Settings → Permissions. From the Form Permissions screen, click either Add Rule by Role or Add Rule by User to get started.
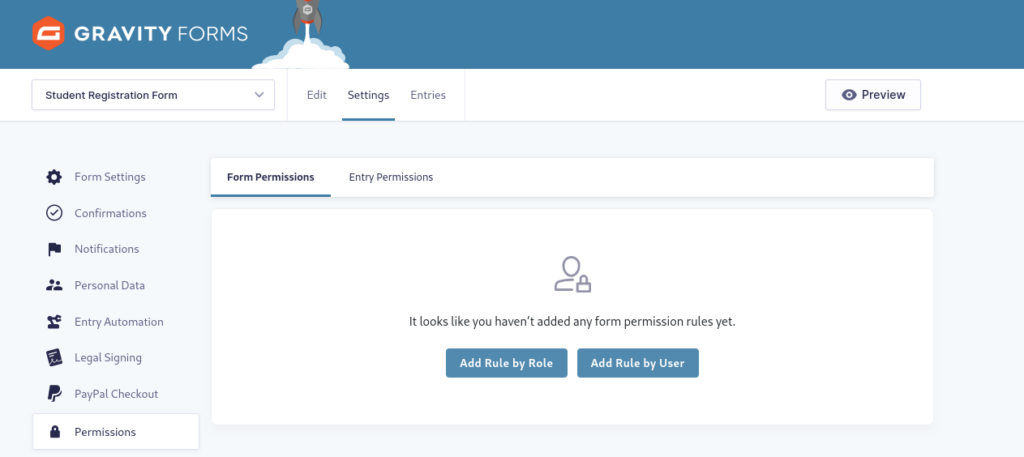
Here’s how to decide which Rule Type to choose:
- Add Rule by User allows you to create the ruleset for a specific user.
- Add Rule by Role allows you to create the ruleset for a user role. These include Editor, Author, Contributor, and Subscriber in the case of a regular WordPress website. If you’re running an online store, you will see additional user roles such as Customer and Shop Manager.
On the next screen, use the Rule Target dropdown to either search for a user or select a role. You can select multiple users or multiple user roles at a time. For example, you could target both subscribers and contributors in one rule.

Alternatively, you could select the is not designator to make the permissions rule apply to anyone who is not in certain roles.
3. Set Access for Permissions
In the next section, choose an option to set access for each available capability. As we mentioned before, permissions can be set to one of three states:
- The default, or inherited state, in which the toggle appears grayed out. It simply inherits the user’s current access to the capability.
- Set it to Enable (blue) if you want to grant the user (or user role) access to that capability.
- Set it to Disable (red) if you want to deny the user (or user role) access to that capability.
The Advanced Permissions plugin allows website admins to control different types of capabilities. It includes native Gravity Forms permissions in addition to some exclusive ones that Advanced Permissions makes available when applying rulesets.
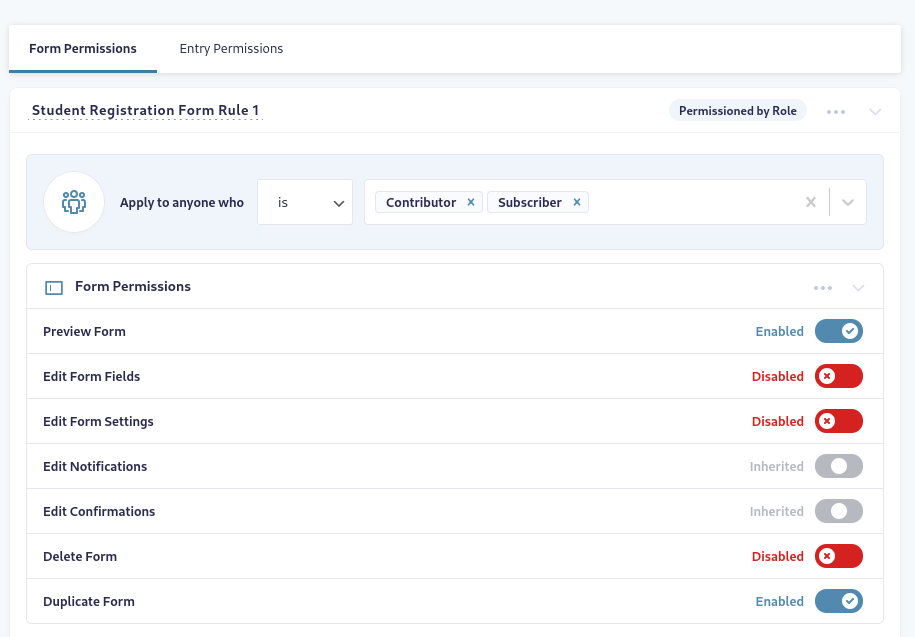
For example, Preview Form and Duplicate Form are native Gravity Forms security permissions. However, Edit Form Fields and Edit Form Settings are exclusive to the Advanced Permissions plugin.
Further down the list, you’ll see that you can also apply rule settings for Entry Permissions, Entry Notes Permissions, and Add-On Permissions.
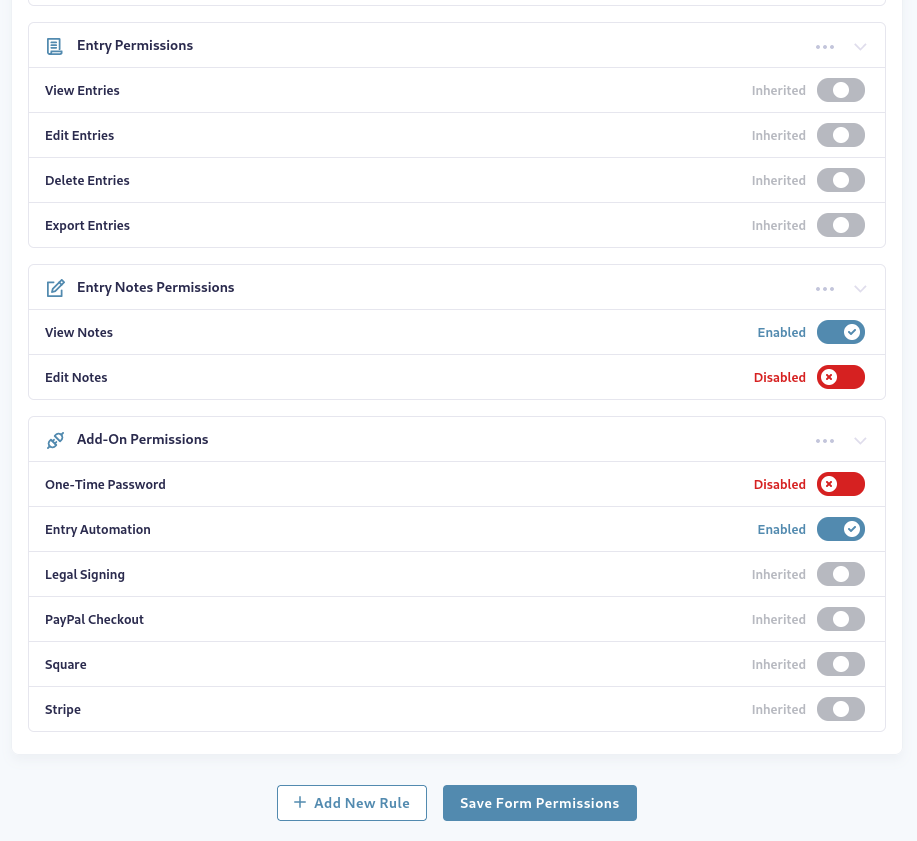
Simply enable and disable (or leave them set to Inherited) the capabilities however you’d like. You can add as many rulesets as you’d like by clicking the Add New Rule button.
4. Entry Permissions
Just as we did with Form Permissions, you can set unique rules for viewing entries. By default, all roles and users with access to entries will have access to all entries. By adding Entry Permissions, only roles or users you designate will have access. This is an extremely valuable part of fine-tuning control over your form permissions.
At the top of the menu, click the Entry Permissions tab. Following our earlier example, select User by Role. You can choose multiple roles as before, and determine whether those roles are included or excluded by selecting Can See or Cannot See in the dropdown. To target which entries the rule applies to, there are three options:
- All Entries
- Entries matching all of the following rules
- Entries matching any of the following rules
In the second two options, you’ll set up Conditional Logic to specify individual entry types. For example, if you wanted to designate sets of team members to handle only student entries based on a specific zip code, you can configure the Conditional Logic and individual user roles to target those entries.
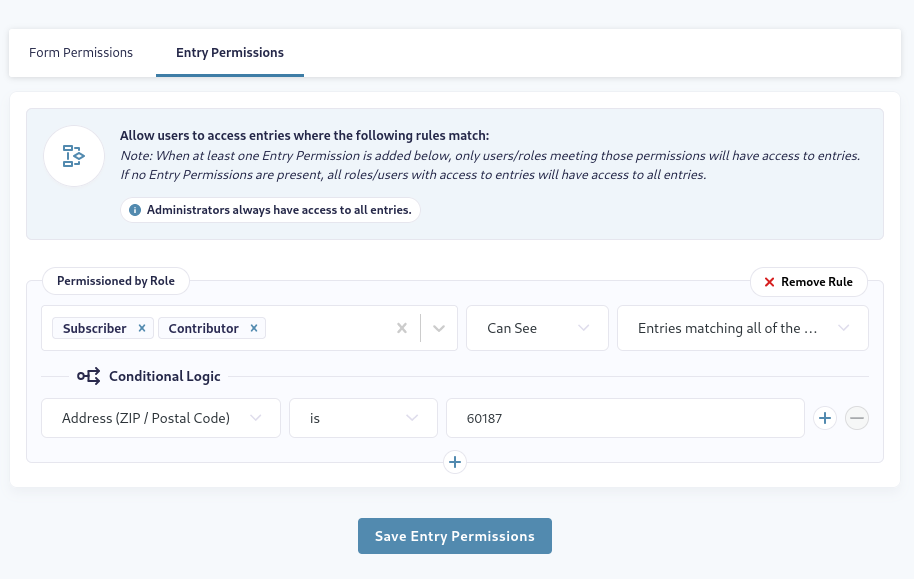
It’s also worth noting that each form can have multiple rulesets. What this means is that you can enable different Gravity Forms features for different users (or groups of users). Rulesets are merged if more than one applies to a specific user.
The key benefit here is that you can disable access to specific features for certain user roles but still be able to enable access to a specific feature for a specific user in that role.
Secure Your Gravity Forms Today
If your site’s visitors or customers are submitting their information (email addresses) or uploading files to your website, you need to take measures to secure your Gravity Forms in WordPress. Although Gravity Forms comes with several security features and form submission features built-in, it’s a good idea to use a robust Gravity Forms security plugin to keep your website safe. It’s also a great way to harden WordPress security.
The Advanced Permissions plugin gives you maximum access management control allowing you to stay on top of Gravity Forms security. With the Advanced Permissions add-on, you can build secure WordPress forms using the form editor, prevent unauthorized users from modifying form fields, keep customer data safe, and minimize any chance of hacking.If you’re ready to boost Gravity Forms security on your website, purchase the Advanced Permissions plugin today.
