Are you getting the most of Gravity Forms’ Save and Continue feature? You may not realize that there are better ways to handle draft submissions data than by using the core plugin alone. In fact, you can create Gravity Forms Save and Continue reports that are easy to read and — even better — easy to access. You need Entry Automation.
Entry Automation is a certified add-on for Gravity Forms that allows you to automate several entry administration tasks including exporting, deleting, and sending notification related to entries. With Entry Automation 5.0, we added the ability to create automations that process not only full Gravity Forms entries, but draft submissions created by Gravity Forms’ Save and Continue functionality.
Key Takeaways
- Understanding Draft Submissions in Gravity Forms: Gravity Forms’ “Save and Continue” feature allows users to save their progress on lengthy forms and resume later.
- Challenges with Managing Draft Submissions: Accessing draft submissions requires direct interaction with the website’s database, which can be complex and is not user-friendly.
- Export Draft Submissions with Entry Automation: The Entry Automation plugin enhances Gravity Forms by enabling the export of draft submissions into readable formats such as CSV, Excel, JSON, or PDF.
- Steps to Set Up Draft Submissions Export: Create a new task, choose “Draft Submissions” as the entry type, configure the schedule, and define the export file format.
- Managing Deletion of Draft Submissions: Entry Automation allows for more granular control over the deletion of draft submissions compared to Gravity Forms’ default settings.
What is Save and Continue?
Save and Continue is a feature of the core Gravity Forms plugin that, when enabled for a form, allows that user to save their progress and finish filling out the form later using the “resume” URL generated at the time of saving. These draft submissions are, however, not readily accessible to every Gravity Forms user. There is a Partial Entries add-on, which creates a Partial Entry when users save their submission via Save and Continue. Still, the only way to view these draft submissions is by looking directly in the database, where the data is not displayed in an easily human-readable format.
A Better Way to Read Draft Submissions
Enter Entry Automation’s Draft Submissions support! With it, you can use any automation action available to you in Entry Automation; particularly, process draft submissions instead of full entries. Plus, you’ll be able to access and read the data like a human instead of a robot.
Here are a couple of use cases that illustrate why these are such powerful features, and how you can use Entry Automation to take advantage of them.
Scheduling draft submission exports
The Problem
Nobody likes losing out on leads. Yet, quite often, leads can go into the drafts submission table in your site’s database via the Save and Continue feature… which is helpful, except that you’ll possibly never hear from those people until they resume and submit the form. You may never even know that a lead exists, as in most cases, you’d need to look for it directly in the database. Draft submissions also get purged from your database on a fairly regular basis (14 days from the last save by default, but modifiable with this filter).
Let’s take a look at how a draft submission looks to someone who needs to go into their database to check if any exist. Delving into the gf_draft_submissions table, you can see the raw data contained in a Gravity Forms draft submission. It contains data such as uuid, email, date created, source URL, and the submission form the form fields themselves.

The information itself can be useful — if you’re technically savvy enough to access and view it. However, the data is stored in one long string of serialized data, so it can be a bit difficult to parse compared to what you may be used to in the entry detail screen or within an exported spreadsheet.
The Solution
With an Export Entries task configured to target draft submissions rather than completed entries, you can export draft submissions to an easily readable file in CSV, Excel, JSON, or PDF format that can be archived and used in your overall business workflows. The Export Entries task can be configured manually, on a scheduled basis, or automatically on form submission.
Now, let’s take a look at an export file that has processed the same draft submission from the database screenshot above. Viewing the exported draft submission as a PDF, for example, you can clearly see any fields that have been completed, along with any data you’ve configured to be included in the export. It’s all in an easy-to-read format, making for a much cleaner report.
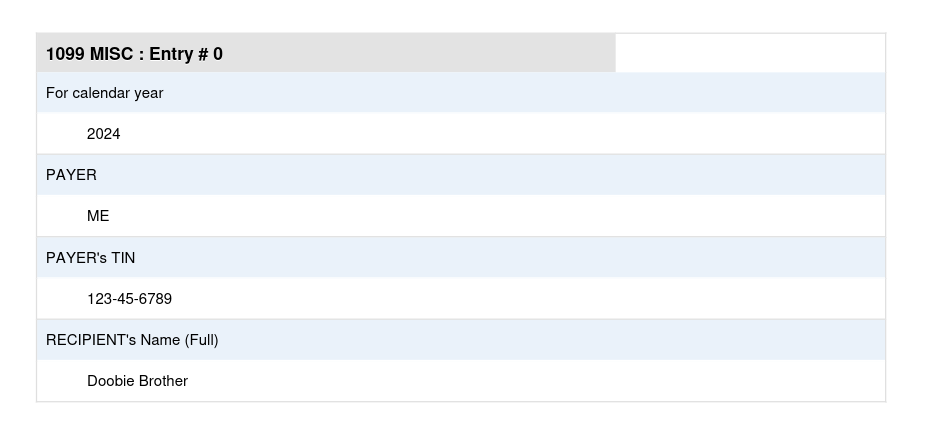
Comparing the two methods, it’s clear how much easier it is to view the data using Entry Automation’s draft submissions export feature.
Having more granular control over draft submission deletions
The Problem
By default, Gravity Forms’ Save and Continue logic automatically deletes any draft submission from the database after a set number of days, the default being 14 days. You can raise this to a custom number of days at a global level using this filter, but that’s a global setting, and you might want more fine-tuned control on a form-to-form level for a setting like this.
The Solution
With a Delete Entries task configured to target draft submissions, you can set up a manual or scheduled task that can delete these draft submissions in a more controlled way on a granular form-to-form level. Additionally, you can use things like our entry targeting and conditional logic settings. These settings — available when setting up a task — have more fine tuned control over which draft submissions you want deleted, skipping those that meet your logic.
Note: If you want complete control over this on a form-to-form basis, you’ll need to use this filter to bump the default global amount of days out to a higher number, then set up a delete entries task for each form where you’ll set up when each form’s draft submissions get deleted.
Setting up a scheduled daily export of all draft submissions
Now that you can see how much easier and more efficient it is to use Entry Automation to generate Gravity Forms Save and Continue reports, let’s go over how it’s done.
Step 1: Create a Task
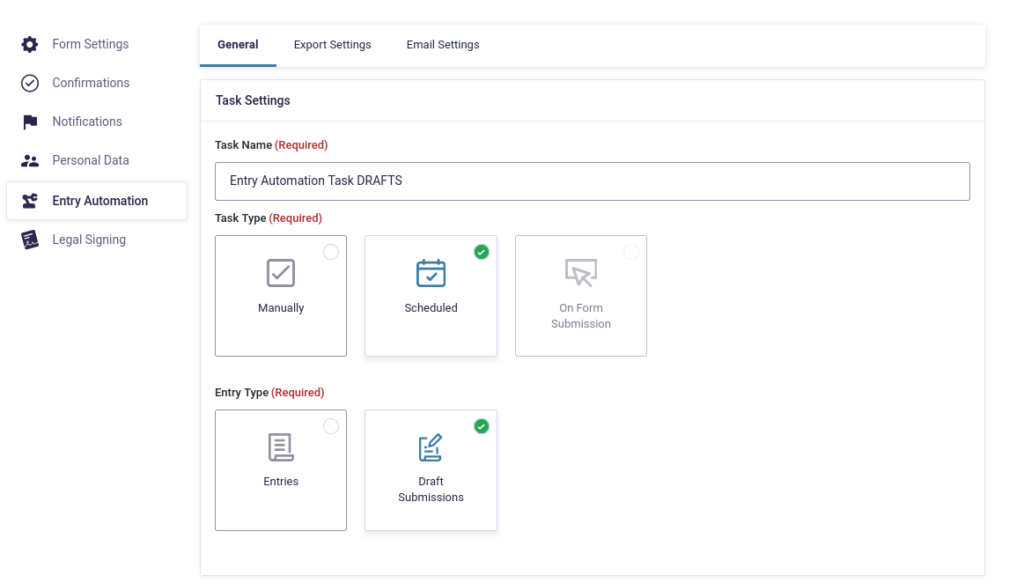
To start, you’ll need to edit an existing form or create a new one using Gravity Forms. In your form under Settings, navigate to Entry Automation. In the Entry Automation Tasks menu, click Add New.
Under Task Type, you’ll want to select Scheduled, and for Entry Type, choose Draft Submissions.
In the next section,Automation Action, you decide what to do with draft entries; delete them, export them, or send a notification. For this example, we’ll choose to export them.
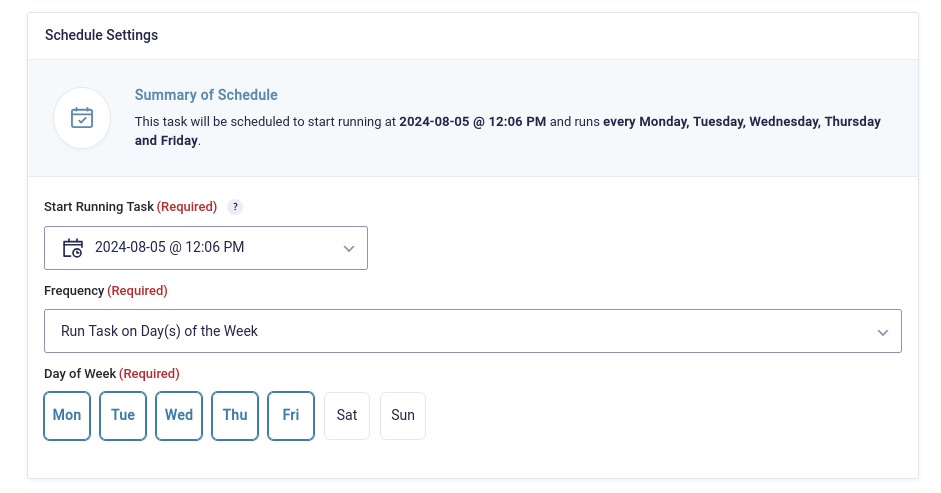
Step 2: Schedule the task
Entry Automation’s scheduling feature makes the whole process a set-it-and-forget-it system. You set what time you first want the task to run and how frequently you want it to run. The Schedule Settings menu gives you full control over export scheduling options.
Step 3: Target Entries Settings
In the next menu, your options are to export All Entries, All Entries Since Last Task Run, or Custom Date Range.
If you choose Custom Date Range, you’ll need to configure the date ranges to match your needs. Save your settings and move to the next tab, Export Settings.
Step 4: Configure the Entry Export File
In the Export Settings menu, first set the file name of the export file. You can use the handy merge tags here if you like by clicking the icon in the upper right of the field.
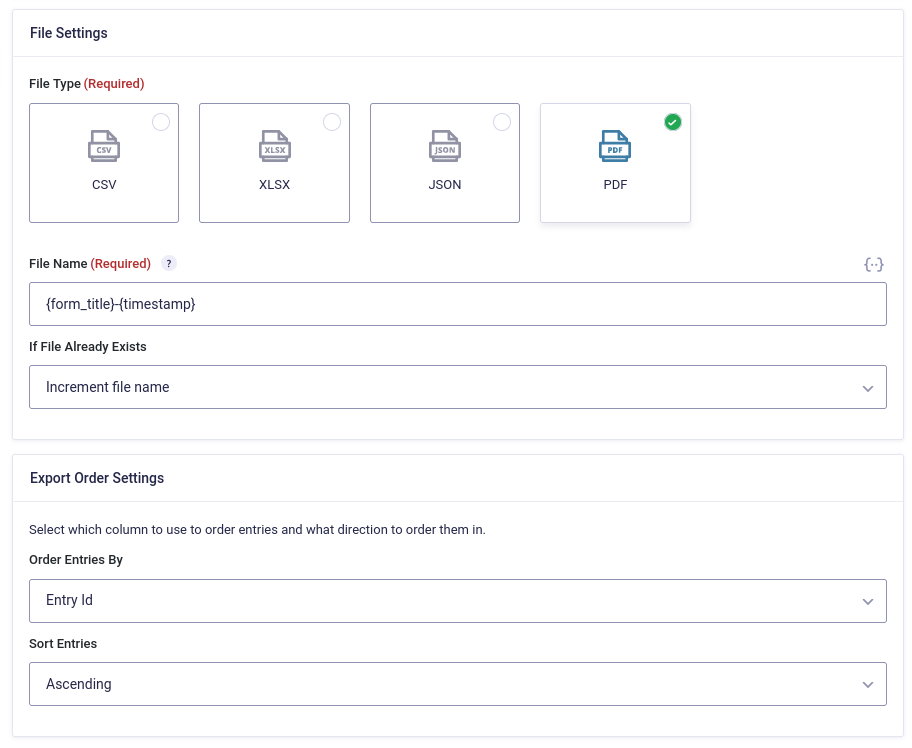
Additionally, you can select which column to use to order entries and what direction to order them in.
You’ll also need to select which form field data you want to be included in the exported file under Field Settings section.
Below Field Settings is the Export Files section. Enable the Include Files with Export File option if you’d like to export them along with the data.
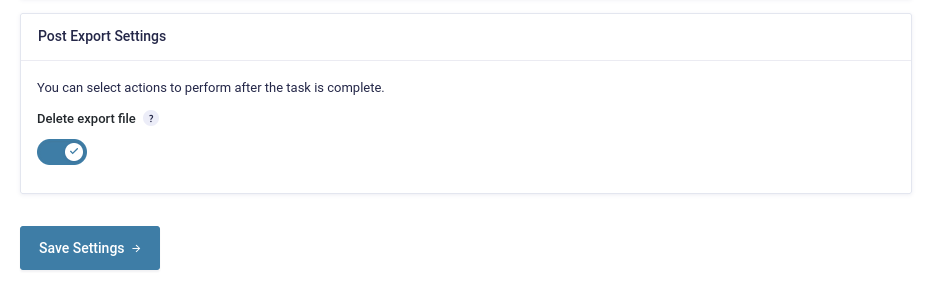
Step 5: Deleting the Export File
Upon execution, Entry Automation automatically saves exported files to a protected folder in your site’s uploads directory. And don’t forget one of the most important settings for our purposes here! The export file can be deleted after export, saving precious server space. Scroll down to Post Export Settings and toggle Delete export file to enable deletion.
Email the Export File Automatically
You can also have exported files conveniently emailed to you and any other recipients you like. Navigate to the Email Settings tab and enable Email Generated Export File. Again, you have handy merge tags to use, which allow you to set the email recipient(s) based on completed fields in the submitted form — or a WordPress user of your choice.
Save your settings, and your draft submission entries will now be automatically exported and emailed based on your custom configurations.
Gravity Forms Save and Continue Reports for Humans
From these few short steps, you can see how simple it is to boost the Gravity Forms Save and Continue feature to a whole new level using Entry Automation.
Sure, you can dig into your database every time you want to see if any draft submissions have come in. That sounds like a quick way to manifest a headache. Instead, you can put down the pain reliever and use Entry Automation to collate and parse your draft submissions for you. It’s easy to set up and even easier to read the data.
Get Entry Automation and put your forms to work for you.