Key Takeaways
- Overview: The post explains how to turn WordPress forms into fillable, downloadable, and emailable PDFs using Gravity Forms and the Fillable PDFs add-on—no coding required.
- Benefits of Fillable PDFs: They allow dynamic form data from users to be output directly into a styled, professional PDF.
- Designing PDF Templates: Create your PDF template using tools like Adobe Acrobat for advanced styling, or Word/Excel/LibreOffice for basic templates.
- Importing PDF Templates: Upload your template in WordPress using Fillable PDFs.
- Creating the Front-End Form: Build a form in Gravity Forms or let the Fillable PDFs plugin auto-generate one based on your PDF.
- Mapping Form Fields to PDF: Use the Fillable PDFs feed in your form settings to select your template and map each form field to its corresponding PDF field.
- Security and Access Controls: You can enable public access, set password protection, and define file permissions.
- Automating PDF Distribution: Attach generated PDFs to email notifications or include download links in confirmation messages using Merge Tags.
- Cloud Storage Integration: With higher-tier licenses, automatically upload generated PDFs to Dropbox or Google Drive for streamlined file management.
- Workflow Efficiency: Using this system enhances both user experience and internal workflow efficiency for handling digital documents and submissions.
Transform your WordPress forms into professional PDFs
Looking to create an online fillable PDF? That’s a PDF where you take some content from your web form, add it to a pre-formatted template, and are able to download or email the completed PDF document. If so, we have the solution!
Fillable PDFs can be useful in all sorts of situations, including applications, contracts, and other legal documents. They’re perfect replacements for paper documents and paper forms. You can take the dynamically-provided information from a WordPress form and output all that data in a downloadable PDF file.
In this fillable PDF tutorial, you’ll learn how to generate a PDF with off-the-rack solutions – no coding or technical knowledge required.We’ll be using WordPress as the platform, where you’ll start with a front-end form.
When someone submits that form, the data will be automatically entered into fillable fields and create a finished PDF document — while preserving the styling of your PDF.

Ready to learn how to set up interactive forms? Let’s get started…
Building secure, customized PDF forms in WordPress
Besides WordPress, you’ll need two things to begin: Gravity Forms and the Fillable PDFs add-on. Once those are installed and activated, you’re ready to start.
Here’s your step-by-step guide to creating a WordPress fillable PDF.
Designing professional PDF templates
At this point, you may or may not already have the WordPress fillable PDF document that you want to use with WordPress. If you do, you can jump to the next step.
If you don’t, this section will explain how to create a fillable PDF document in some easy ways.
Step 1: Create your PDF template
First, if you care about the styling and layout of your document, your best bet is to use Adobe Acrobat as it will give you the most flexibility. You can design your PDF using Acrobat’s many features and then create fillable PDF fields by following these instructions.
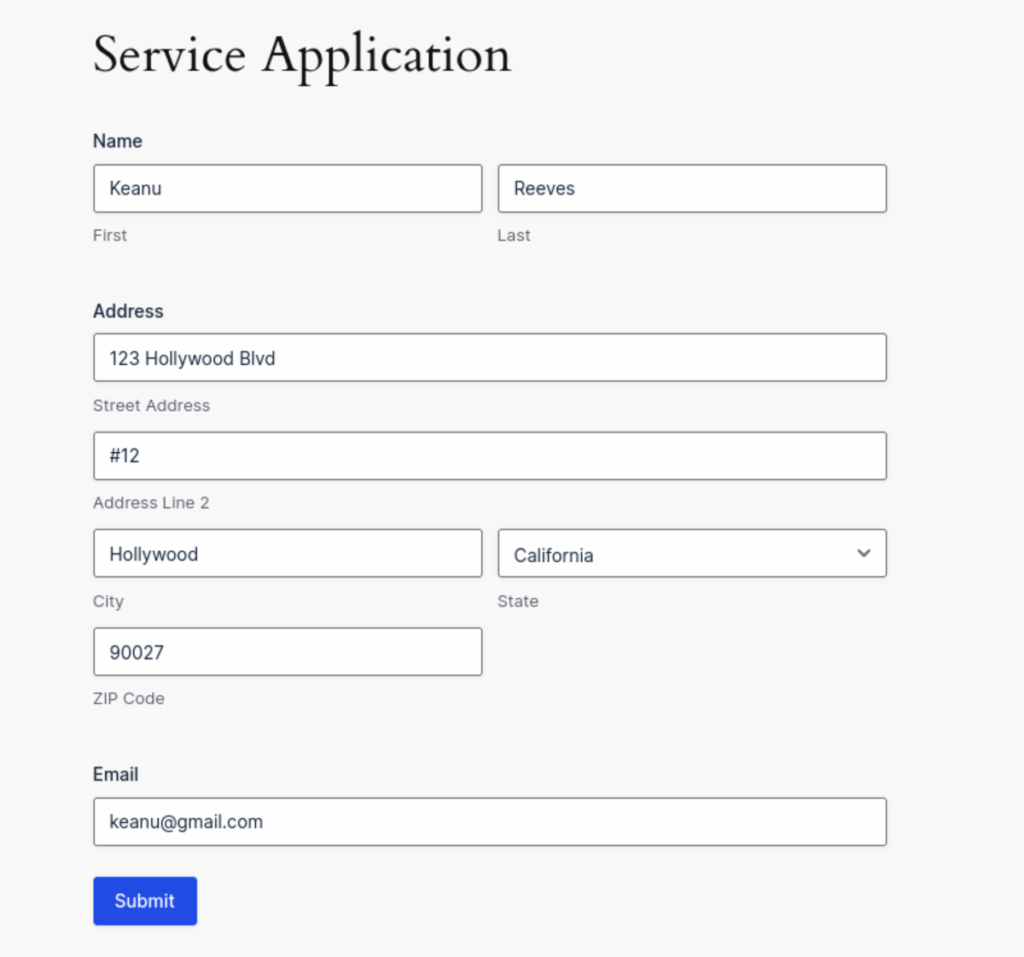
You can also use Microsoft Word, Excel, or LibreOffice to create a bare-bones fillable word document and use the export to PDF option to save as a PDF document. Just make sure your PDF contains fillable fields. It’s also helpful to label each field, which makes it easier when you map the fields in later steps.
Step 2: Import your PDF template
When your template is ready, go to your WordPress Admin and navigate to Forms → Fillable PDFs → Templates. Click Add New.
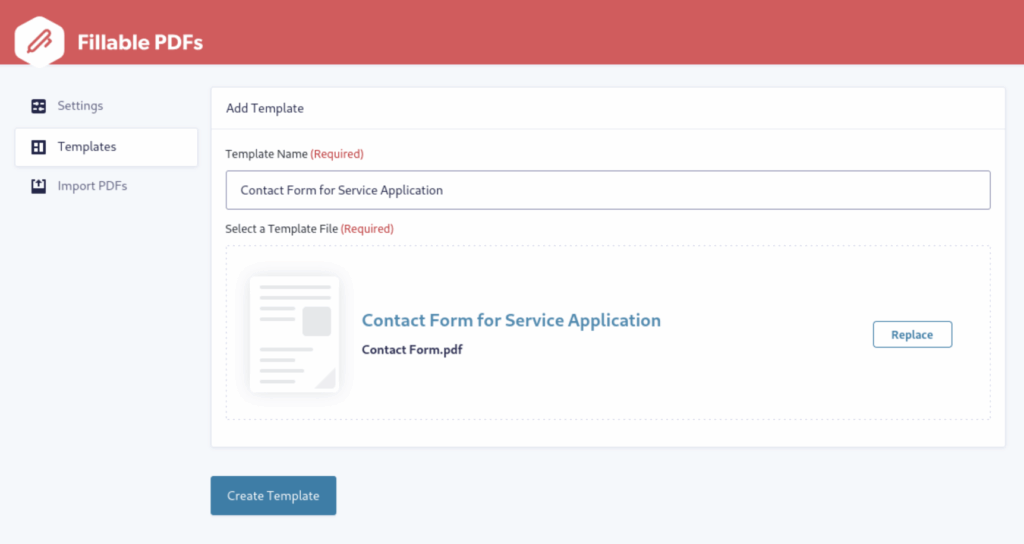
Give your template a name, then drag in or click to add the PDF template you created. Click Create Template and it will be saved, ready for the next steps.
Setting up your PDF form system securely
In later steps we’ll lock down your generated PDFs with password protection and restrict views to only those you trust. First, let’s create the form which users will interact with on your website.
Create your front-end form
Next, you need to create the front-end form that your visitors will use to enter data into the WordPress fillable PDF.
You have two options here. You can:
- Manually create a form in Gravity Forms by going to Forms → New Form or use an existing form — OR —
- Save time by letting the Fillable PDFs plugin automatically create a form for you based on the fields in your fillable PDF file. (Note: this is only available to Professional Fillable PDFs license or above).
To have the Fillable PDFs plugin automatically create a form for you…
- Go to Forms → Fillable PDFs.
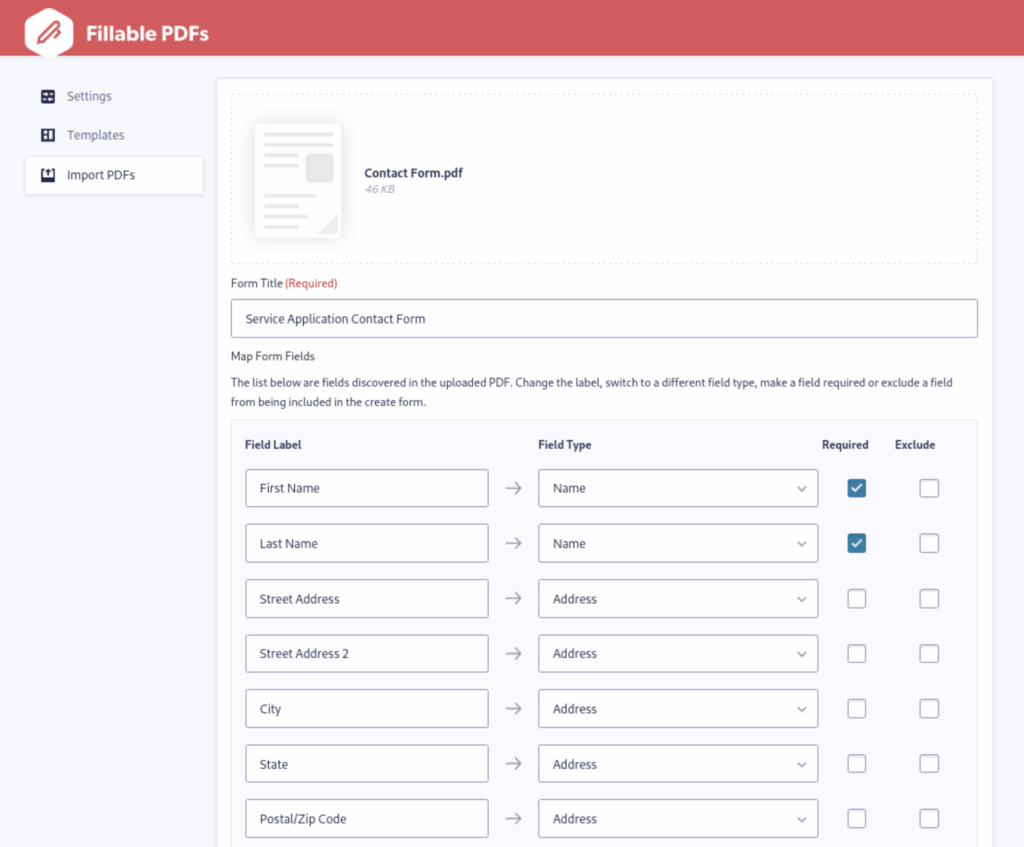
- Click on the Import PDFs tab in the Fillable PDFs for Gravity Forms interface.
- Either click to browse or drag and drop the PDF template into the marked area to begin importing.
Now that your form is built and your PDF template is ready, let’s pull it all together.
Mapping form fields and optimizing PDF performance
The magic of Fillable PDFs is how it maps the fields in your web form right to your PDF template. Here’s how to do it:
Step 1: Create a Fillable PDFs feed
In the form editor of your form, navigate to Settings → Fillable PDFs. Click Add New to create a feed.
Give your feed a name, then choose your PDF template from the drop-down.

Enter an Output File Name, using the handy merge tags or type in any file name that makes sense for you. Then select which notifications the generated PDF will be attached to. You can also apply any conditional logic to further specify when a PDF is generated.
Step 2: Map the fields
In the PDF Template section, click the Map Fields button, which will open a modal window displaying your PDF template.
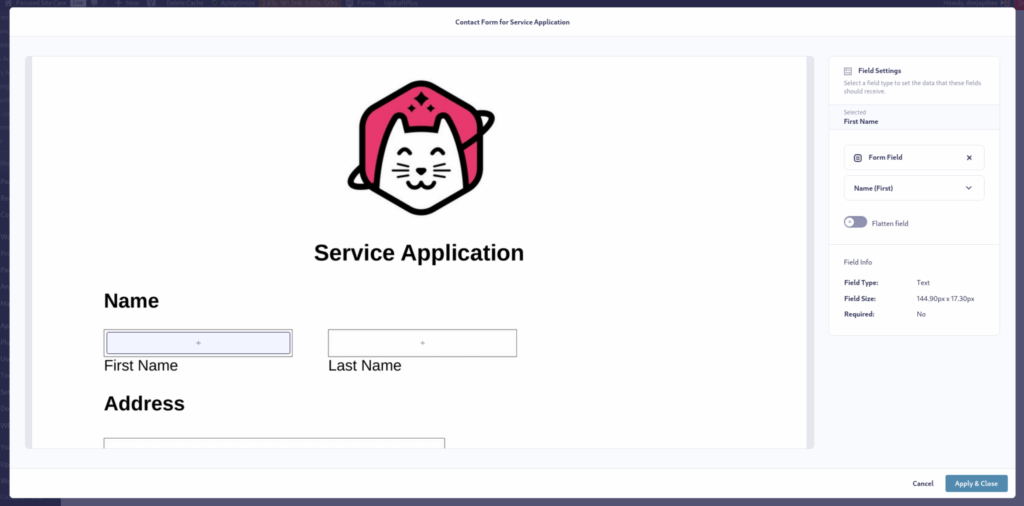
Select a field in your form. A menu will appear on the right where you can choose the Form Field that corresponds with the selected field in your template. Repeat for each field in your template. Click Apply & Close.
Save your settings in the Feed menu.
Automating PDF generation and submission management
Now you have a fully functional web form that will generate a PDF with the user’s information, using your custom template design. But there’s more you can do to manage the process!
Add Restrictions
Fillable PDFs secures your generated PDF by disabling public access by default. That means that only the submitter or an admin may access it. You can enable public access if you wish.
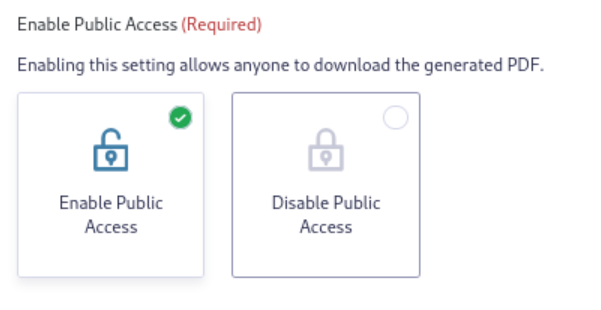
Navigate to the Advanced Settings tab inside your form at Settings → Fillable PDFs. You can enable or disable public access as you desire.
There are further security restrictions you can set in this tab. For example, you can set a password for access so that even if someone downloads the PDF they can only view it with the password.
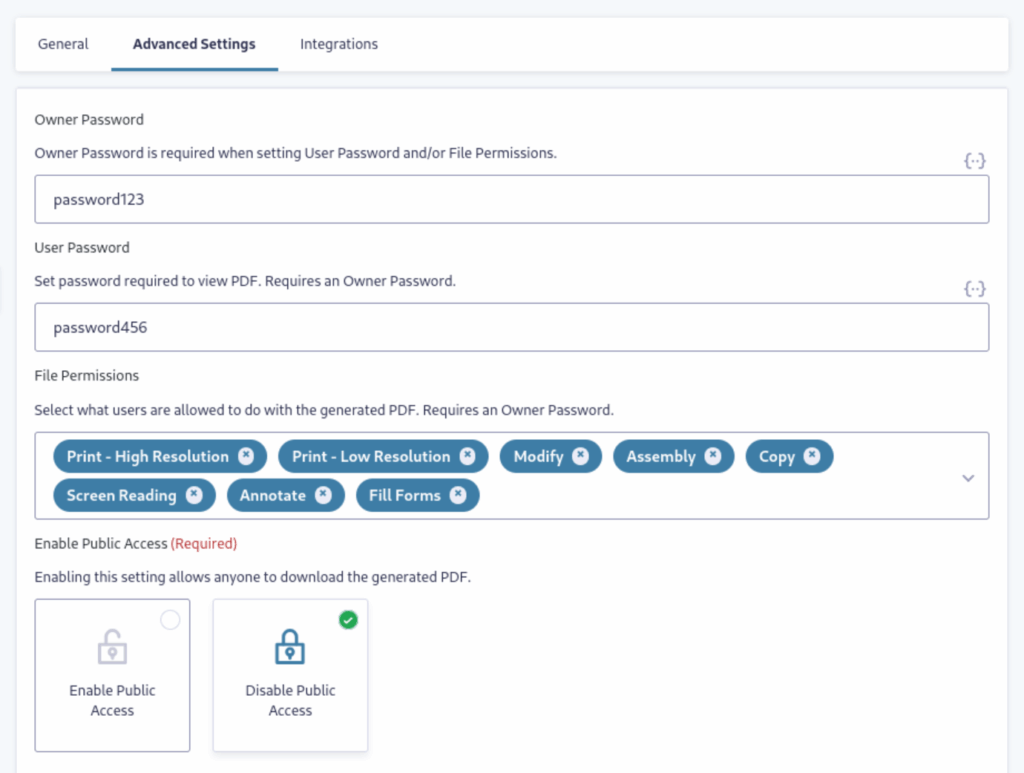
You can also set additional File Permissions to select what users are allowed to do with the generated PDF, such as Print, Modify, Assembly, Copy, and more.
Attach PDF to email
In a previous step, I mentioned how to attach the generated PDF to an email by choosing any notification you have created from the dropdown menu. There are also additional options for including links to the PDF in confirmation messages. It’s easy to set up:
Step 1: Edit or create a notification
Under Settings → Notifications, you can use the default Admin notification or create a new one — for example, if you wanted to notify the submitter or others.
Step 2: Add the Fillable PDFs feed
Customize your message however you like. Then, to add a link to the generated PDF to the message, click the Merge Tag icon and scroll down to the Fillable PDFs section. The main Merge Tag you need to select is the “Feed” tag. This will ensure the generated file is attached to the notification.
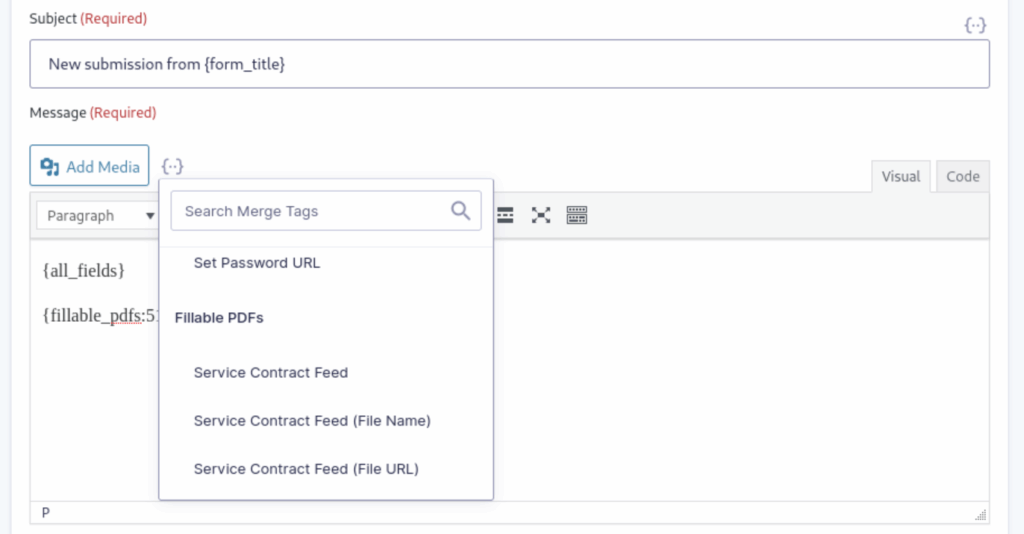
There are also Merge Tags for your Feed’s filename and the URL of the generated PDF.
Upload to cloud storage
Taking things a step further, it’s also possible to have the generated PDF automatically uploaded to cloud storage on submission. With a Fillable PDFs Pro or Agency license you can upload PDFs to Dropbox or Google Drive.
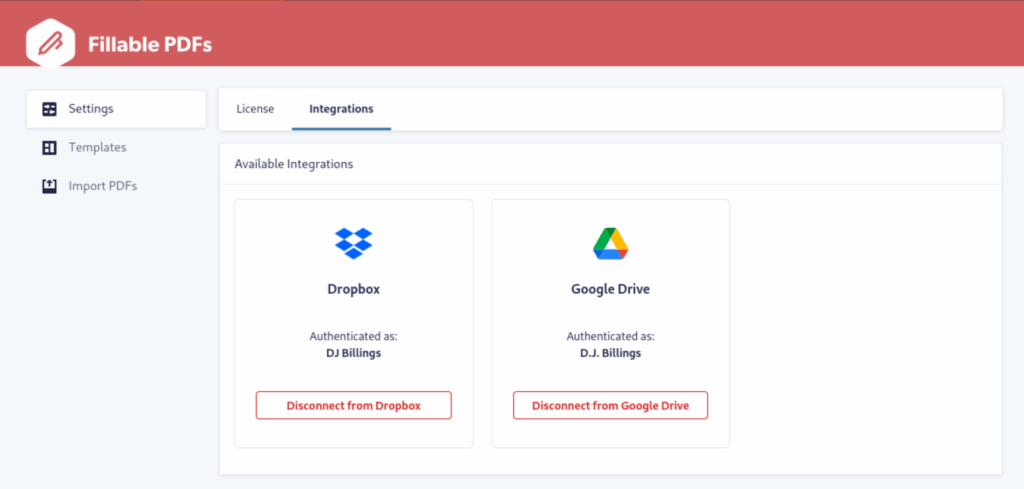
First, connect to either storage platform account at Fillable PDFs → Settings → Integrations.
Back in your form’s Fillable PDFs feed, head to Settings → Fillable PDFs → Integrations
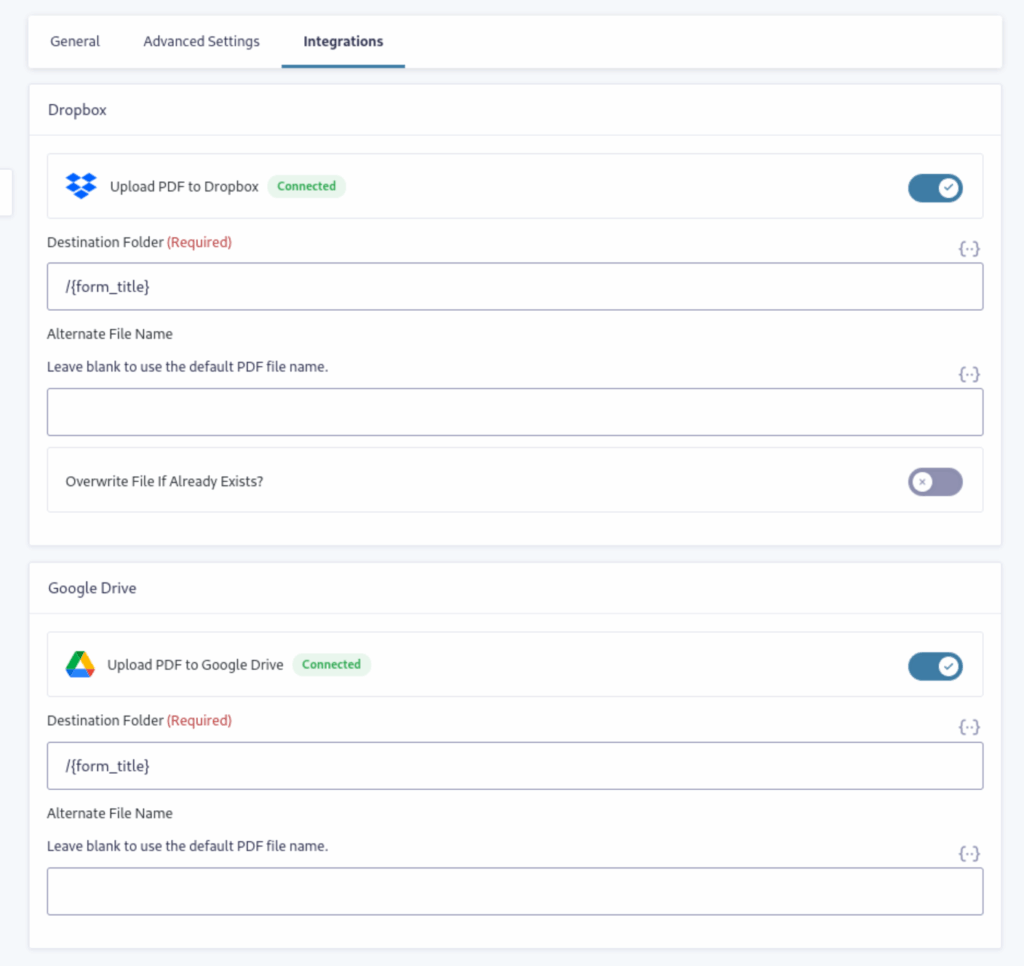
Click the toggle to enable cloud storage. Then, add a destination folder manually or by using Merge Tags. You can define a file name for the PDF or leave the field blank to use the default.
Now your generated PDFs will be uploaded and stored in the cloud, waiting for you or your team to analyze!
Streamline your document workflow with WordPress PDF forms
When you use WordPress, Gravity Forms and Fillable PDFs for your applications, contracts, and other legal documents, you’re not only providing your users with an easy-to-use system, you’re making workflow much more efficient for yourself and your team.
Bookmark this WordPress Fillable PDFs tutorial, and go check out the other features included in this add-on!