You may not be aware that user roles are a crucial part of a WordPress site’s ecosystem. There is great power in managing them more effectively! In this post, I’ll show you how to greatly enhance security, streamline your team’s workflow, and boost productivity — all by managing WordPress user roles.
Key Takeaways
- Default WordPress user roles: Administrator, Editor, Author, Contributor, and Subscriber roles have varying access levels.
- Customizing user roles: Enhance security, optimize workflows, scale with site growth, restrict content by membership tiers, and manage plugin-specific tasks.
- Gravity Forms user role management: Use Advanced Permissions to enable tailored permissions by user or role to protect sensitive data and streamline form workflows.
- WordPress user role best practices: Audit and regularly review roles to optimize content creation and approval workflows.
- Security measures: Recommended are two-factor authentication for all roles, continuous monitoring of permissions and user activity.
Default WordPress user roles: Understanding your options
Let’s review the basic WordPress user roles and see what capabilities each can access. I’ll list them in order from highest to lowest level of access.
Administrator: The all-access pass
When you first create a WordPress site, you’re automatically given administrator privileges so that you can manage all aspects of the site, such as:
- Installing, updating, or deleting plugins and themes
- Creating, editing, and deleting all content, such as posts, pages, and media
- Adding and deleting other users — and assigning their user role
- Editing the site via the site editor
- Editing any code on the site
Every WordPress site requires at least one Admin account. Be very selective about who gets assigned this role.
Editor: Content management maven
Editors are the next level down from Admins. While they can control content, they can’t modify site settings or install plugins and themes. However, they can:
- Create, edit, publish, and delete posts and pages from all users
- Moderate comments
- Manage categories and tags
- Upload and delete media
If you need someone to manage your content but not alter your site, you should assign them the Editor role.
Author: Independent content creator
This role is ideal for regular contributors who only need control over their own content. Authors can:
- Create, edit, publish, and delete their posts
- Upload media to their posts
Authors can’t create new categories or moderate comments.
Contributor: The supporting writer
This role is best for occasional contributors or guest writers. Contributors can only write and edit posts, which an Editor or Administrator must review before publishing. Contributors also can’t upload media files or modify published content.
Subscriber: Basic access for readers
Subscribers have the least permissions; they can only manage their profile and change their password. This role is typically used for membership sites or blogs requiring user registration for commenting or accessing restricted content.
Customizing WordPress user roles: Enhancing productivity and workflow
While the default roles cover general use cases, custom roles provide flexibility and granularity that are especially useful in complex or specialized scenarios. Here are some examples.
Enhanced Security
Custom roles allow site administrators to limit access to sensitive areas, reducing the risk of unauthorized changes or accidental errors. For example, you can create a “Developer” role that grants access to theme and plugin settings without giving complete administrative control.
Workflow Optimization
Assigning tailored roles ensures users focus on their specific tasks, which streamlines workflows. For instance, a “Content Manager” role can be created to handle posts and pages without interfering with site-wide settings.
Scalability for Growing Sites
As websites expand, teams grow, and workflows evolve, and custom roles can adapt to new responsibilities and organizational structures. This scalability is particularly useful for e-commerce sites, educational platforms, or membership sites where user access levels need to change dynamically.
Role-Based Content Restrictions
Custom roles enable fine-grained control over content visibility, such as restricting premium content to specific membership tiers (e.g., “Basic Member,” “Premium Member”). This functionality is vital for membership sites, subscription-based services, or gated content models.
Plugin-Specific Roles
Many plugins (e.g., WooCommerce or Yoast SEO) introduce unique roles like “Shop Manager” or “SEO Editor” to efficiently manage plugin-specific tasks. Custom roles can refine these permissions based on your site’s specific needs.
Improved Collaboration
Custom roles promote better teamwork by ensuring each user has access only to the tools and features relevant to their role. For example, creating a “Marketing Team” role allows team members to manage campaigns without accessing backend settings. This can be especially useful with form management, which we’ll cover in detail shortly.
Client-Specific Requirements
For client projects, custom roles ensure clients have the exact level of access they need without compromising site security. For instance, a “Client Editor” role might allow editing content but restrict access to technical settings or comment moderation.
How to Create Custom Roles: Plugins vs. manual methods
Custom roles can be created using plugins like “User Role Editor” or through coding with WordPress functions such as add_role() and add_cap(). Plugins offer a user-friendly interface for non-developers, while coding provides precise control for advanced users.
Custom WordPress user roles are indispensable for sites requiring tailored access control, efficient workflows, and enhanced security. They empower administrators to create a structured environment that aligns perfectly with their site’s unique demands.
We’ve covered the basics of WordPress user roles. Now, let’s get more specific and see how to implement granular form-level and field-level access control in forms.
Advanced Permissions: Elevating WordPress user role management in Gravity Forms
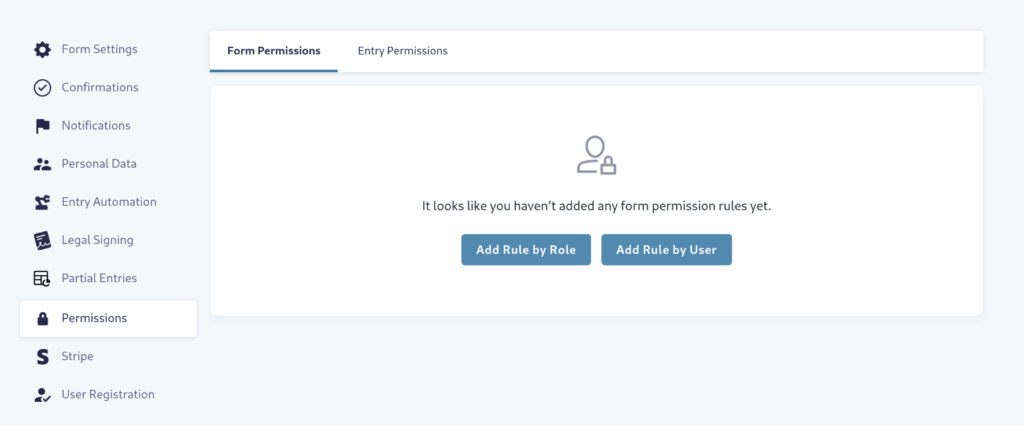
To create a more efficient workflow in your forms, you need to level up your user role management. A robust system of user permissions is easy to set up through the Gravity Forms add-on, Advanced Permissions. The add-on allows you to block or provide access to forms and entries for any non-admin user or user role. Let’s take a look at a practical example.
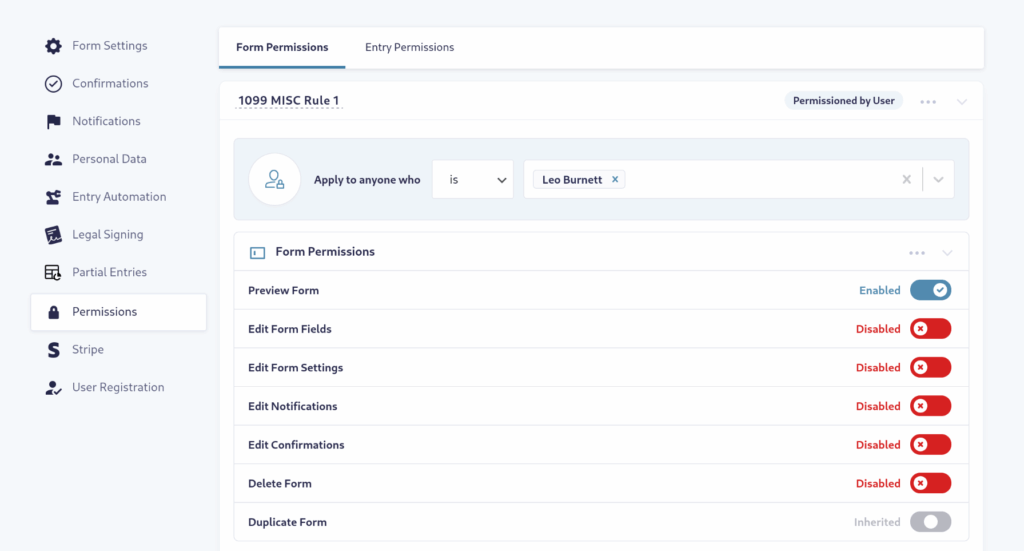
Say you have a tax form on your site for clients to fill out, like a 1099-MISC. You’ve taken great pains to set up the form and notifications, and you don’t want anyone on your team to mess it up accidentally. However, you need team members to view and analyze the entries. Using Advanced Permissions, you can block access to the form editor and allow access to entries for this specific form.
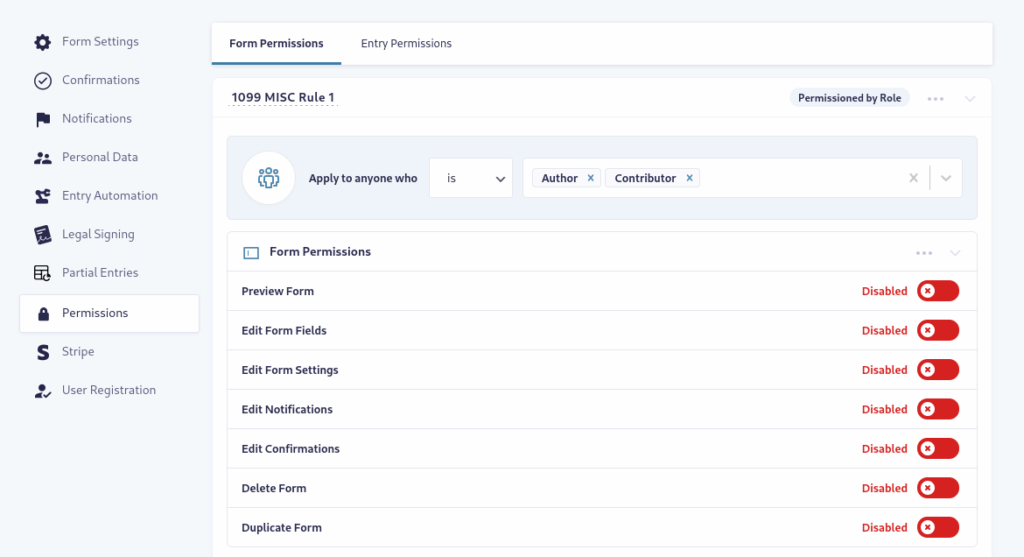
In the Forms menu, hover over the form and select Settings → Permissions. Now, you can add a rule by role or by user. For this example, let’s choose a role.
The following menu will give you a dropdown where you can select any role registered on your WordPress site. You can apply the rule to as many roles as you need. It’s also possible to apply the rule to anyone who is not in a particular role. However, you may only choose one option or the other for a particular rule. You can set up additional rules for other options.
Next, use the toggles to choose the permission for each activity in the list. You have three choices:
- Disable: Prevents the user from performing that function.
- Enable: Allows the user to perform the function.
- Inherit (default): Automatically applies the default permissions for that user’s role in WordPress.
For example, if you don’t want the user role to be able to edit the form, you could turn off all Form Permissions.
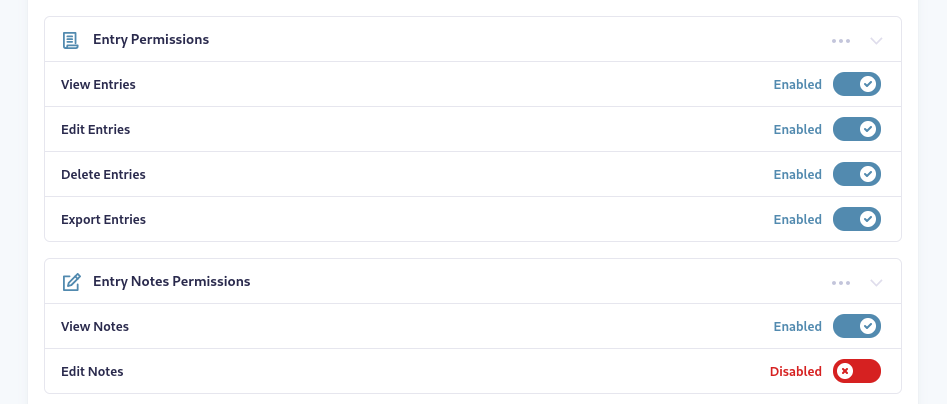
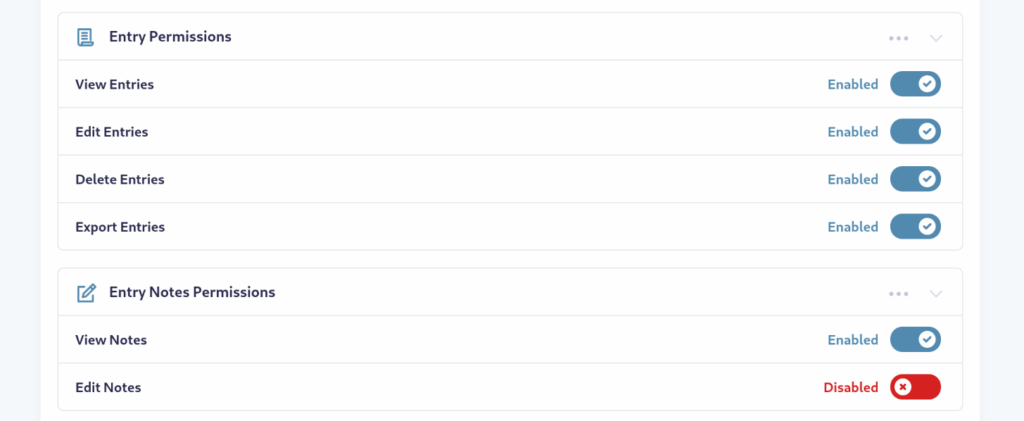
Conversely, you will want to enable Entry Permissions so that the user role can view and work with entries as needed.
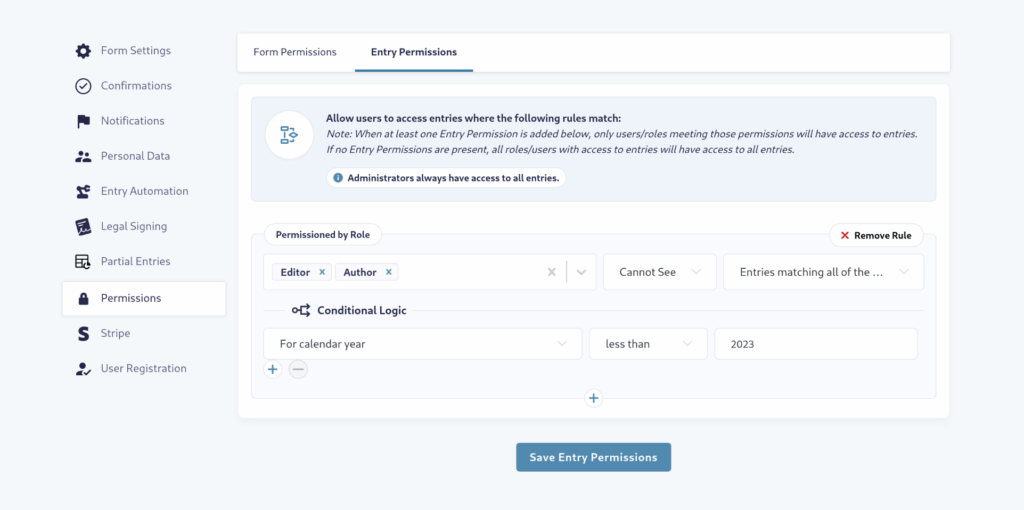
Let’s flip the script. Instead of allowing all entries to be seen, you can safeguard sensitive data with tailored WordPress permissions.
Setting Default Permissions
If you create many forms, you may not have time to set up individual permissions for each one immediately. To prevent accidental changes, you can set up default permissions, which will be automatically applied to each new form. For example, let’s say you have a team member who needs to analyze form entry data, but you don’t want them to be able to edit the form.
First, navigate to Forms → Advanced Permissions → Default Permissions. Click Add New Rule. You can choose between adding a new permission rule by role or user. In this example, we’ll choose by user.
Under apply to anyone who, select is from the first dropdown. Clicking the following dropdown will populate the list with all users on your site. Select the user you want to manage. This is exactly the same method as setting permissions for individual forms, except that these settings will apply to new forms you create automatically.
Move down the page and turn each permission on or off as needed. This way, you can set up custom default permissions for each user and user role.
You can always go into any individual form and override the Default Permissions settings.
Now that I’ve shared the how-to of managing user roles in your Gravity Forms, let’s talk about some overall best practices.
Best practices for assigning and managing WordPress user roles
The first step in good user role management is to conduct a comprehensive audit of all existing users. Consider each user’s current permissions and evaluate whether they’re appropriate for what they need to do on your site. This is also a great time to make notes about users and roles so you can more easily set default permissions, as we just discussed.
Least privilege
After evaluating each user and their role, you can apply the “principle of least privilege” in WordPress. Rather than grant as much permission as possible, you should default to applying the bare minimum of privilege the user needs to accomplish their goals. The least privilege principle helps keep your site secure and clearly defines expectations and limitations.
Reviewing Permissions
Once you’ve audited each user and adjusted their role, it’s a good idea to establish a schedule for reviewing and adjusting user permissions. You might already have new users set to Subscriber by default. However, you should reassess older users regularly.
Optimizing WordPress workflows through strategic user role management
Efficient content creation and approval workflows are essential for maintaining quality and consistency on WordPress sites, especially as teams grow. An optimized WordPress content workflow typically includes these stages:
- Content Creation: Authors or contributors draft content.
- Initial Review: Editors or designated reviewers check for accuracy, quality, and adherence to guidelines.
- Editing: Content is revised based on feedback.
- Final Review and Approval: Senior editors or approvers give the green light for publication.
- Publishing: Approved content goes live.
Specifying responsibilities at each stage ensures accountability and reduces bottlenecks.
Teams work better together when everyone clearly understands their roles and responsibilities. You can foster good team collaboration by managing role-based access in WordPress. For example, your authors can focus on creating initial drafts, mark them for review, and move on to new content while waiting for feedback. Your editors focus solely on reviewing and approving. This practice makes the whole system extremely efficient and your team more satisfied with their contributions.
Optimizing form management
Streamlining workflows is just as important with your forms. With Advanced Permissions, you can set up separate rules for creating and editing forms and reviewing, editing, and deleting entries. Because everyone clearly understands their role and permissions are preset, they’ll be a more efficient part of the forms workflow.
Overcoming common challenges in WordPress user role management
Achieving the right balance between flexibility and security in WordPress role assignments is essential for protecting your site while enabling efficient collaboration. Communication with users is crucial. Ensure users understand their roles and responsibilities by providing a guide or through personal training. Training reduces accidental misuse of permissions and fosters a security-conscious culture.
Managing user roles in a WordPress Multisite environment introduces unique complexities compared to single-site setups. Some things to be mindful of are:
- Lack of centralized user management — modifying roles needs to be done site-by-site
- Security risks from excessive permissions — beware of making too many users Administrators or Super Admins
- Managing passwords and user accounts across multiple sites can lead to password fatigue and insecure practices, such as password reuse or weak passwords
- Regularly auditing user roles and permissions is essential for security but can be labor-intensive in multisite networks
Security best practices for WordPress user roles
As I mentioned, running a comprehensive audit of all users and their roles is essential. The audit will help you identify and mitigate potential security risks before they become a problem. And don’t neglect your form permissions! Even if you have Default Permissions configured, it doesn’t hurt to regularly peruse your default setup and inspect permissions for individual forms.
Implementing two-factor authentication for critical WordPress roles is also a good idea. In fact, consider requiring 2FA for all user roles. It may sound like overkill, but it’s a good way to train team members and subscribers on the importance of good online security.
Unfortunately, great security isn’t a one-shot deal. Just like upgrading your plugins, site security needs to be maintained regularly. That can mean monitoring both permissions and user activities. You’ll need a plugin like WP Activity Log, Sucuri, or Jetpack. Using one of those plugins will give you clear insights into user activities and help secure your WordPress site.
Elevate your WordPress site management: Next steps for optimizing user roles
I’ve covered quite a bit about managing WordPress user roles here—everything from the basics to streamlining your team’s workflow to enhancing your site’s security. From here, I encourage you to take a deep dive into your forms. Optimizing user roles through the power of Advanced Permissions can improve your workflow and further boost security.