Creating a Multiple Forms Task
Using the Multiple Forms Extension for Entry Automation, you can set up an automated export that processes data from any number of forms in your Gravity Forms install and exports it to a single file.
Note: The Multiple Forms Extension is only available to Professional and Agency tier Entry Automation license holders.
To get started with a Multiple Forms task, you need to first navigate to the Forms > Entry Automation > Multiple Forms Tasks page of your WordPress admin panel.
This is where you’ll manage all of your existing Multiple Forms tasks going forward, but to get started, click the Add New button above the tasks list table.
Configuring General Task Settings
The General settings tab of a Multiple Forms task contains most of the baseline settings you’ll use to set up the framework of the task including items like the Task type, how often your Task will run, and which entries will get included when it runs and from which forms.
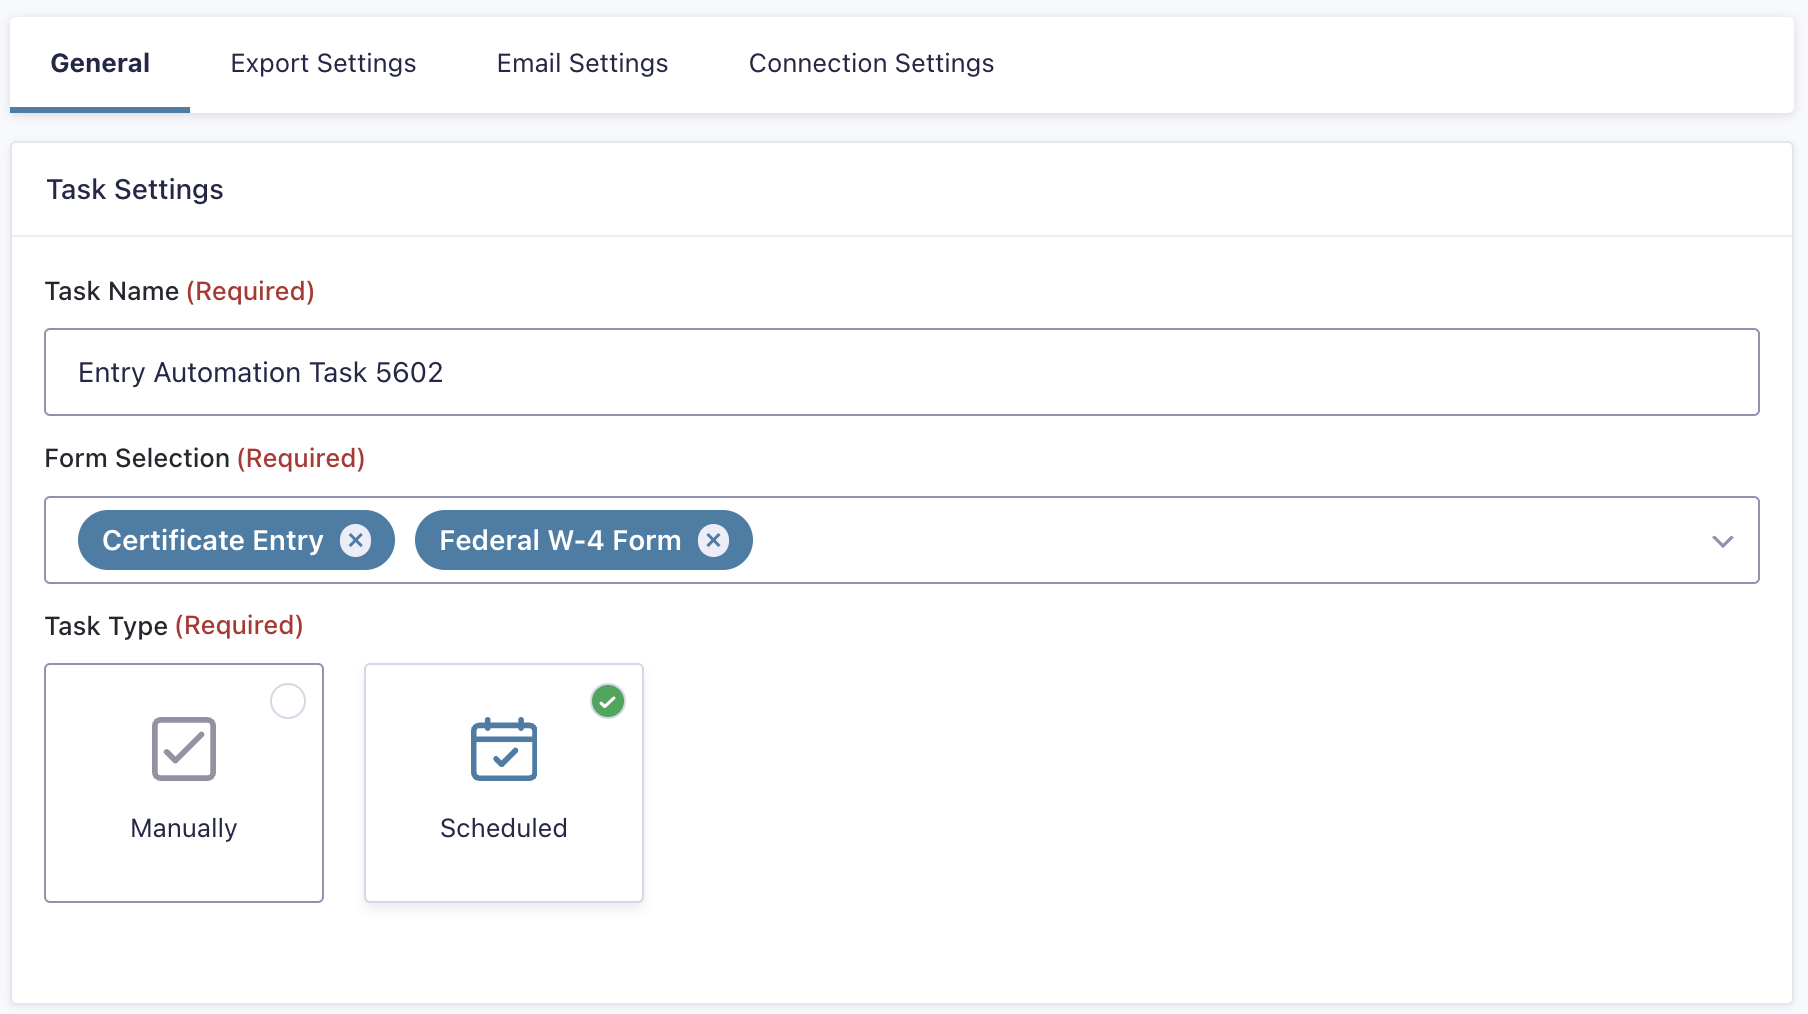
Here you’ll configure a few baseline settings of the Task including its name and what basis you’d like it to run on. To get started:
- If desired, rename the Task from the default generated name.
- Select the multiple forms you’d like the task to process data for.
- Select your Task type. You can choose between the following options:
- Manually – The Task can only be run manually via the “Run Task Now” button available when editing a Task.
- Scheduled – The Task will run on a schedule that is configured within the Task.
Schedule Settings
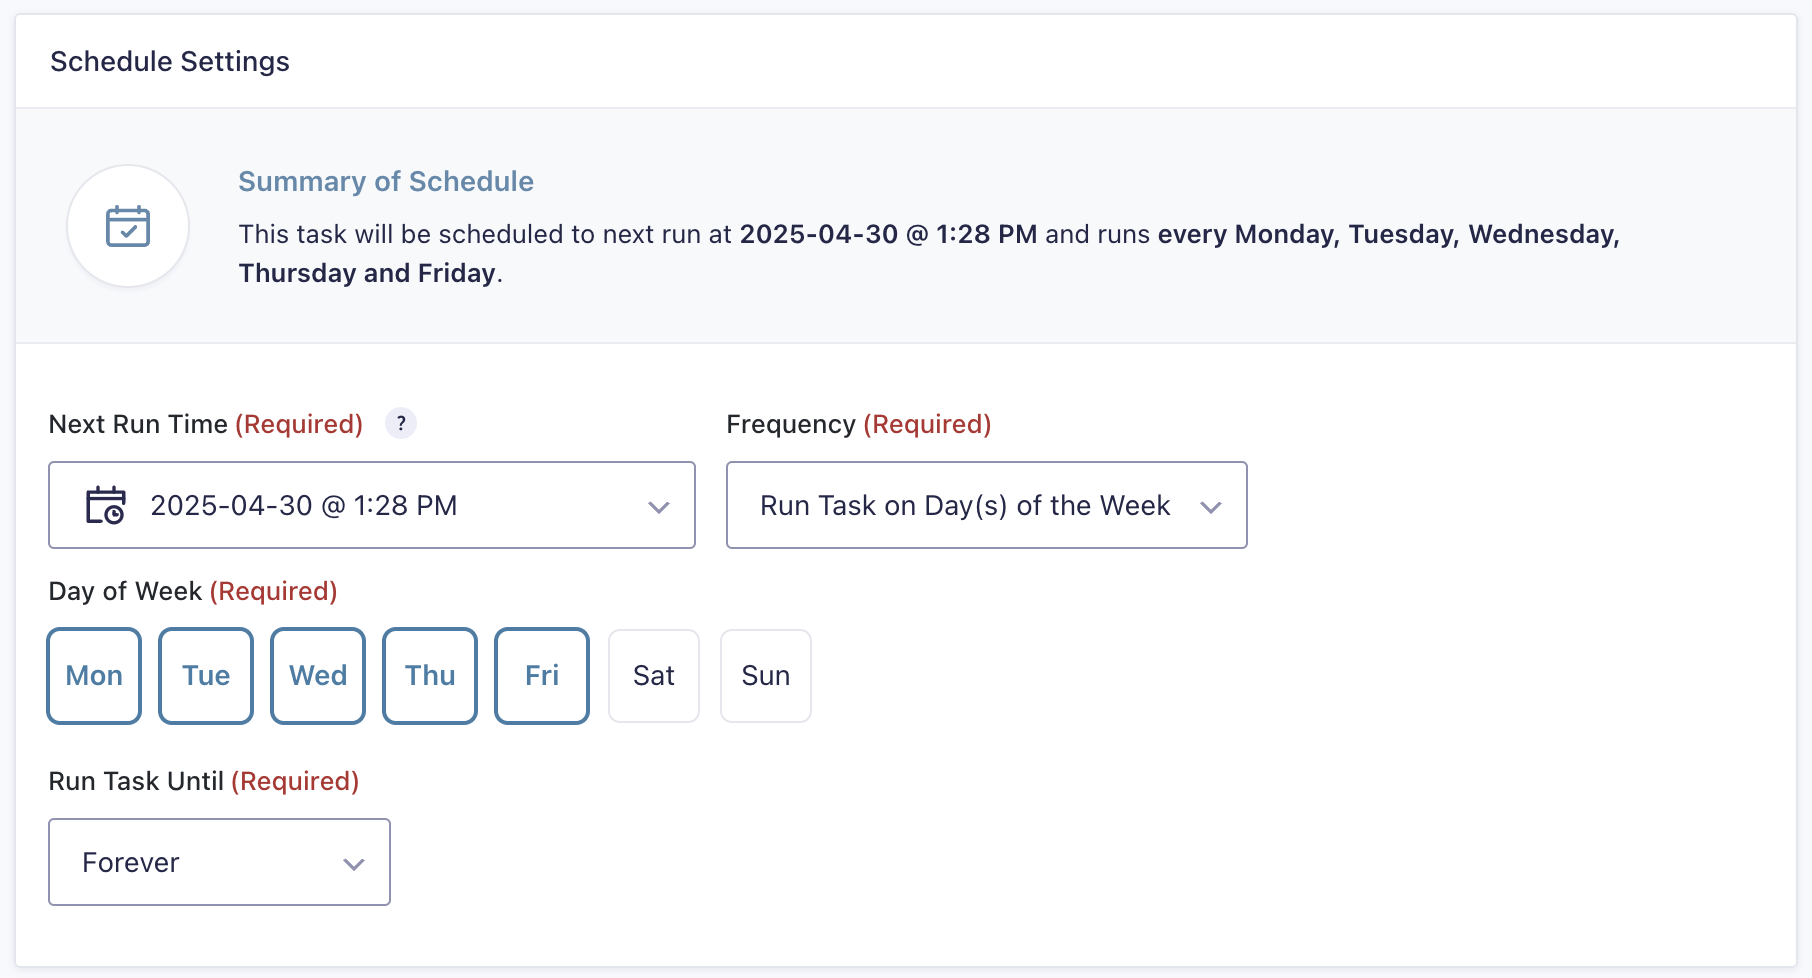
If running a Task with the Scheduled type selected, the Schedule Settings section will be available in the General settings tab.
Here you can control how often and when the Task will run and export your entries.
- Set your desired first run time for the Task, all future Tasks will begin running relative to this time based on the frequency you choose.
- Configure your frequency the Task will run in the Frequency dropdown. You can choose from:
- Run Task Every… – Allows you to set a custom interval of Minutes, Hours, Days, Weeks, or Months at which the Task should be run, e.g. every 1 Hour or every 2 Days.
- Run Task on Day(s) of the Week – Allows you to set which days of the week the Task will be run, e.g. you can set up a Task that only runs every Monday, Wednesday, and Friday.
- Run Task on Day(s) of the Month – Allows you to set which days of the month the Task will run, e.g. you can set up a Task that only runs on the 1st, 15th, and 31st of each month. (Note: In this example if the current month has less than 31 days the Task will still run on the correct equivalent day relative to the amount of days in the month.)
- In the Run Task Until setting you can optionally configured a cutoff date/time for the task to cease running on its established schedule, when the next scheduled runtime exceeds this cutoff the task will cease running. This setting defaults to the task running in perpetuity forever.
- Once you’ve configured your schedule, you’ll want to double-check the Summary of Schedule at the top of the settings box to verify the description of the schedule output there matches your desired schedule.
Target Entries Settings
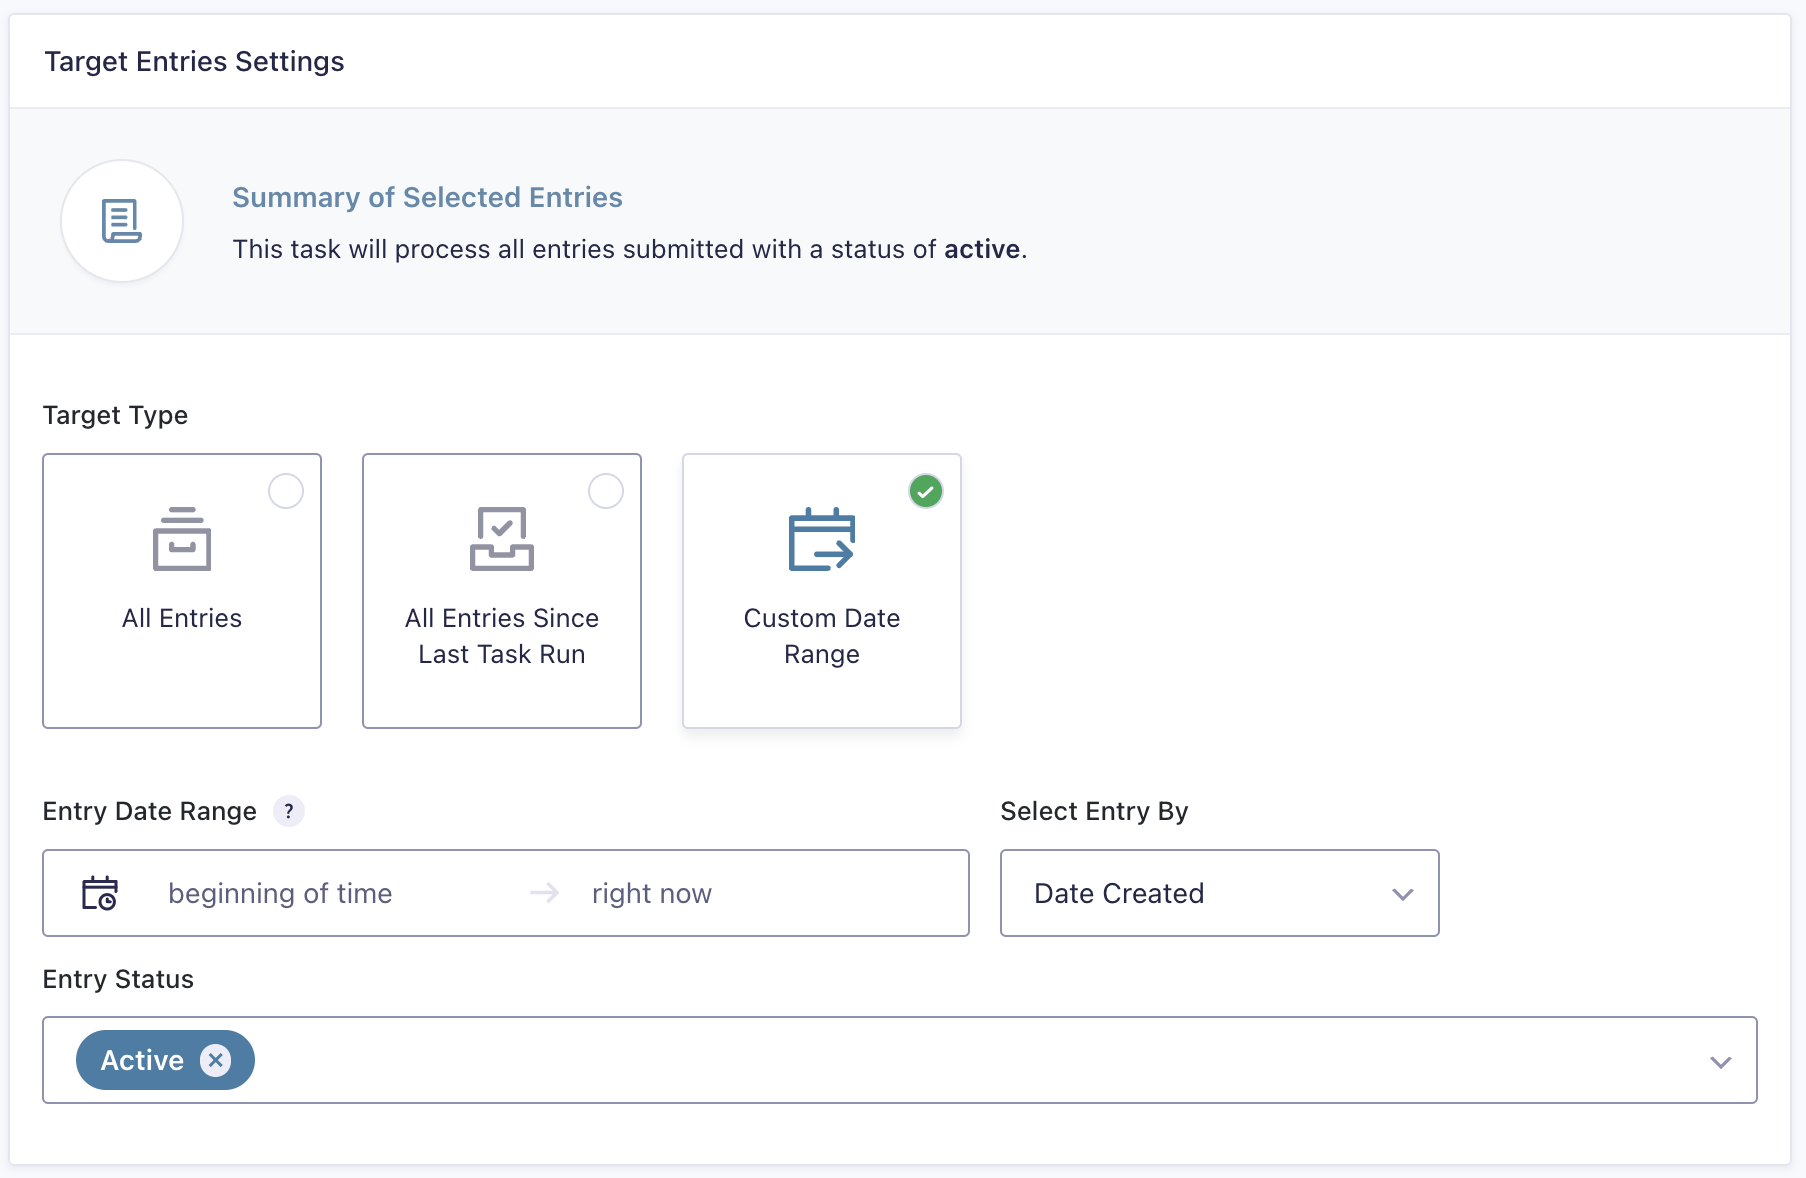
Here you’ll have a few options to determine which entries will be included when your exports run, all three have a common Entry Status setting for further filtering:
- All Entries – Includes all entries.
- All Entries Since Last Task Run – Includes all entries that have not been processed since the last runtime of the Task occurred.
- Custom Date Range – Allows you to set up a custom date range to determine which entries should be included in the export. For more detail on this setting, please see our documentation on Understanding the Date Range
Configuring Export Settings
The Export Settings tab plays host to the settings for the export file that will be generated when the Task is run. Here you’ll configure things like the file name, the fields and entry meta to include in that file across all forms the task is processing, and much more.
With Entry Automation you have a few options for the format your export files will be generated as, these include:
- CSV
- XLSX (Excel)
- JSON
You can also configure your desired file name and what the Task should do if a file of the exact same name exists on your system when a new file is to be generated. In the If File Already Exists dropdown your options for handling that are:
- Increment fIle name – A new file will be generated using the configured file name with an incremented number on the end.
- Overwrite file – Totally overwrites the existing file with the newly generated file.
- Add entries to file – Writes the entries processed by the Task into the existing file.
Export Order Settings
Here you can control the order entries will be written to the export file based off a key within the entry in either ascending or descending order.
Field Selection Settings
This is where you’ll select the fields across all forms the task will be processing and is the aspect of setting up a task that differs the most significantly versus setting up a single form task.
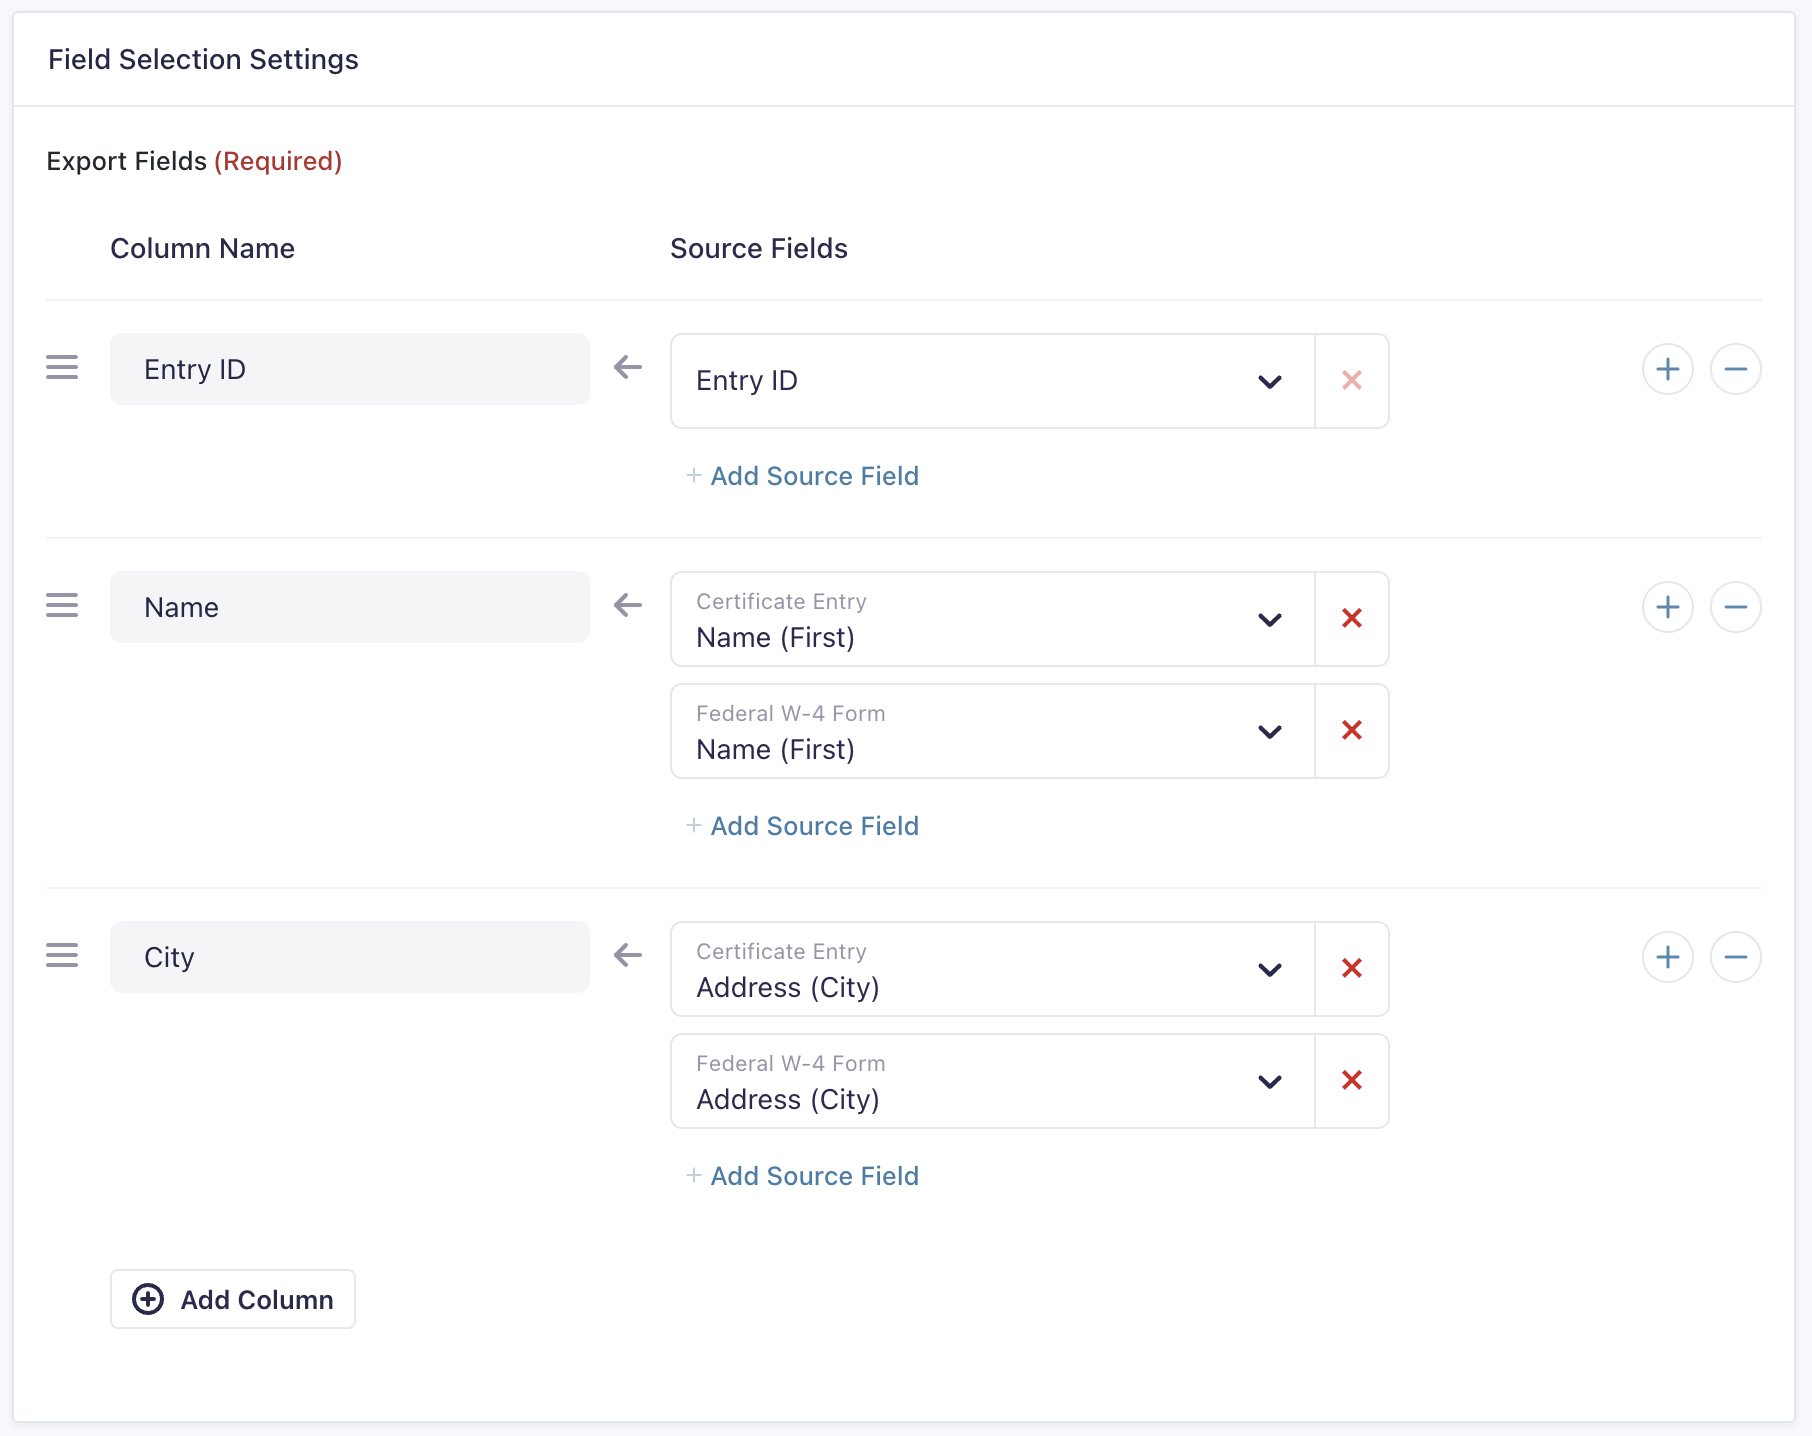
To get started, you’ll have to add your first column, which the settings UI will prompt you to do. Once a column is added, give it a name and in the dropdown to the right you can start selecting the source fields or entry meta you’d like to pass into the column when the export file is generated.
When adding a source field to a column, you are permitted the following selections:
- If exporting form field data, you can select one field per form you have targeted by the task, i.e. if you have two forms selected in your General settings tab that the task is targeting, you can select one field from each form in any given column you’ve added here.
- If exporting entry meta data like entry ID, entry date, etc. you can select only one of these per column and they cannot be combined with fields from any form targeted by the task. (Note: only standard entry meta is supported in version 1.0 of the Multiple Forms Extension, any custom entry meta or entry meta added by another third-party add-on will not be available for selection here)
Once you’ve met the criteria for either of the above for a given column, options will begin to go into a disabled state which can include things like not being able to add an additional source field to the column once a maximum is reached, not allowing you to select more than one field for a single form, etc.
Once you have one column sorted, you can use the buttons available in the UI to add another and repeat the process of adding source fields until you have a skeleton of how you’d like the export file to look when the task runs.
Columns can be organized in the desired order by the drag and drop handle towards the left of the column name settings input.
Export Files
This section allows you to include uploaded files, signatures generated via the Signature add-on or Legal Signing, and PDFs generated via Fillable PDFs/Legal Signing along with your export file. Supported file sources will be listed here, organized by their respective form.
More on this settings module can be found in our dedicated Including Files with Exports documentation article.
Note: This section will not appear if your selected forms do not include any of the supported file sources mentioned in the above linked documentation.
Post Export Settings
This section contains actions you can toggle on that will run after the Task finishes running.
Currently the only available option is to enable deletion of the export file on your site’s system after the Task finishes running. This is a good setting to use if you’re emailing the file as part of the Task, but do not wish to keep the file around on the site’s system.
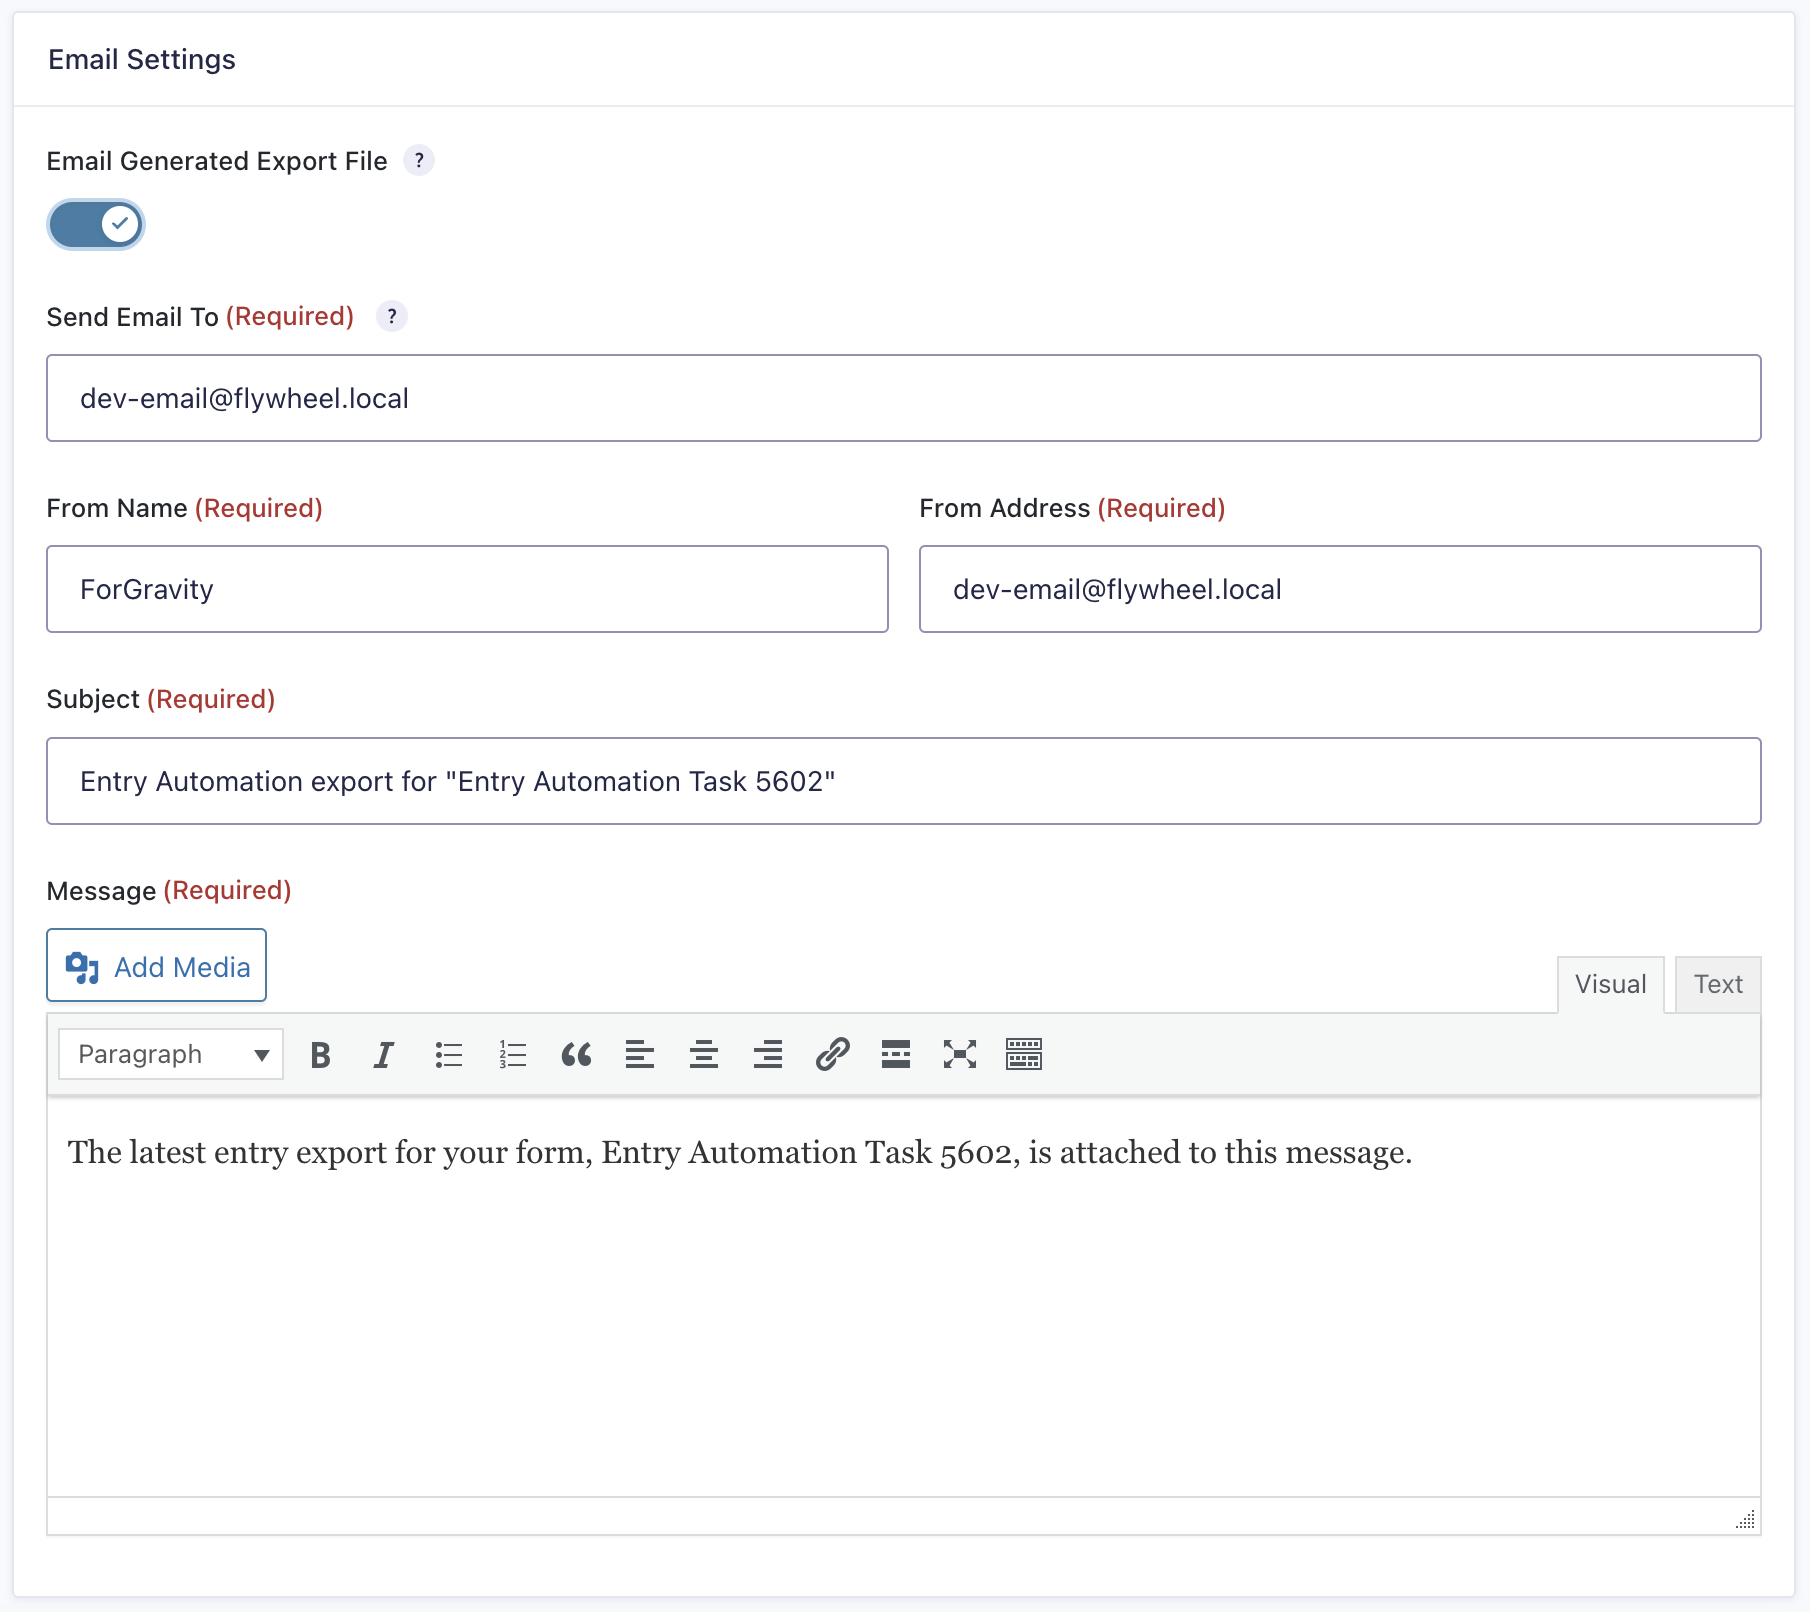
Email Settings
You can also optionally set up your Task to email you the generated export file, this is enabled in the Email Settings tab.
When enabled, you will have a handful of typical email related settings at your disposal to customize the email that the file will be attached to.
Keep in mind with this email, Entry Automation (and Gravity Forms), does not send any emails itself, we just generate the mail object as you’ve configured it in the settings and hand it off to the rest of your site’s setup to handle the sending. If you’re having issues with email deliverability, your first step should be to take a look at Gravity Forms’ great documentation resource for Troubleshooting Notifications.