Using the Document Hub
With Legal Signing 2.0, you can now utilize our Document Hub block to display documents tied to Signing Workflows directly within a page or post on your site. If a user is part of a Signing Workflow and views the page, they can see documents in a few different possible states:
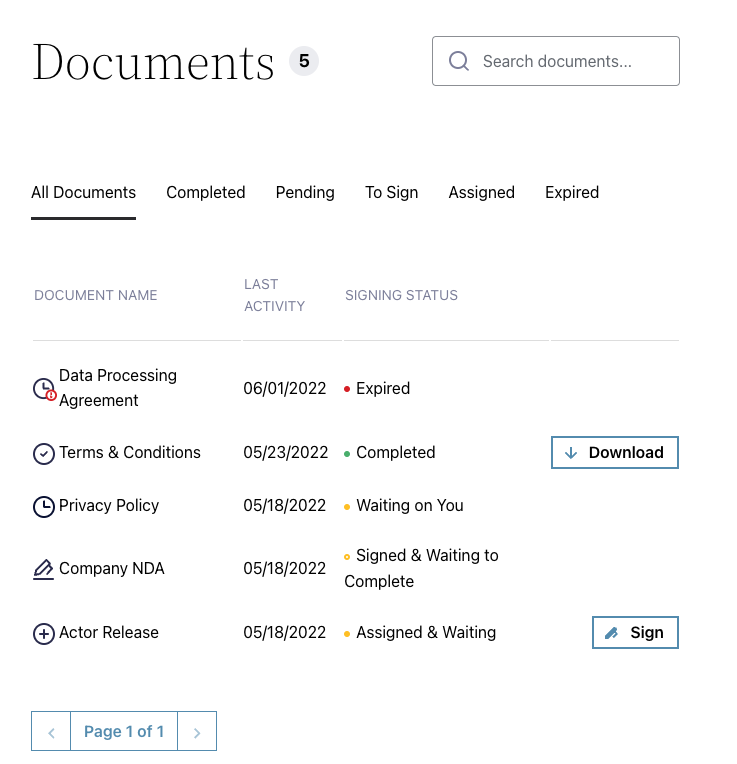
- Completed – Documents that have had a full Signing Workflow successfully completed, provides a button for downloading the file.
- Waiting on You – Documents tied to a Signing Workflow that is currently waiting for the user viewing the hub to sign or verify their identity.
- Signed & Waiting – Documents tied to a Signing Workflow that the current user has already signed but the workflow is currently waiting on the rest of the signers to complete their end of signing.
- Assigned & Waiting – You are a signer in the Signing Workflow for this document, but it is not yet your turn to participate in signing.
- Expired – The workflow tied to this document is expired due to all signers not completing their part of the workflow prior to the expiration date set in the Signing Workflow settings for the associated Legal Signing feed.
Adding a Block to Your Page
- Open the page or post you want to display generated PDFs on.
- Click the plus sign to add a new block.
- In the Search for a block, type legal.
- Under Embeds, click on Legal Signing Documents. This will insert the Document Hub block.
- Click on the block to change the block options in the sidebar, there are several options available that are touched on in more detail in the next section including pagination and hiding or renaming certain columns.
If you’re not using the WordPress Block Editor, you can still utilize the block by using the Reusable Blocks Extended plugin to create sets of reusable blocks that can be inserted via traditional shortcodes.
Any documents tied to a Signing Workflow found that are associated with the logged in user will be displayed in the hub. If no documents are found, the hub will still load but display a message to this effect.
The hub will also not display documents that were never tied to a Signing Workflow, for the display of documents that were generated via Legal Signing feeds that did not have a Signing Workflow enabled in their settings, check out the regular Legal Signing block.
Notes:
- You can only add one Legal Signing Documents block to a page or post. The block editor will stop you from doing this for a single block, but if you do add a duplicate version of the block to the page via other means it may cause the Document Hub to cease functioning properly
- When adding a Legal Signing Documents block to a page or post, placeholder data will always be shown in the editor preview, never real documents.
Block Options
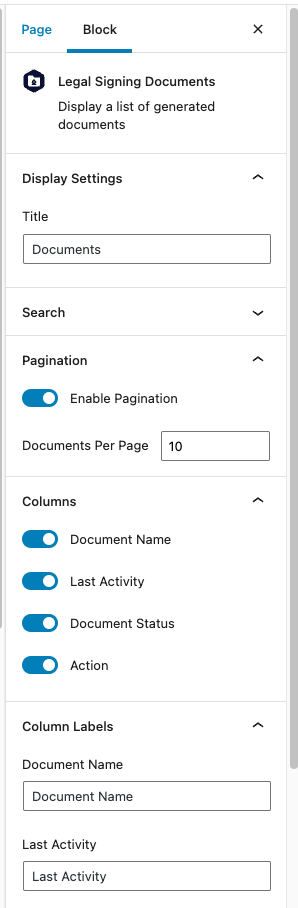
Display Settings
Set a title for the block.
Also available here is a toggle, enabled by default, to require signers to verify their identities via email when signing via the block.
When toggled on, any active workflows currently waiting on the logged in user viewing the hub to take action will have their button to verify/sign send them either the Initial Signatory Verification (for signer #1) or Ready For Signing notification (for signers #2+) instead of taking them directly to the form to perform either action.
When toggled off, anyone with access to the user with the signer’s email address viewing the Document Hub will be able to either verify or sign directly by clicking through the hub.
We’d strongly recommend leaving the above setting toggled on as it only enhances the validity of the legally binding documents you’re generating via Legal Signing.
Search
Choose whether to have searching of the hub be enabled or disabled, defaults to enabled. If search is enabled, a search input placeholder setting will also be available which defaults to “Search documents…”
Pagination
Choose whether the hub will have its results paginated, defaults to pagination being enabled. If pagination enabled a setting to control the amount of documents per page will be available which defaults to 10 documents.
Columns
Allows you to toggle which columns are visible in the hub, defaults to all columns being visible.
Column Labels
Change the column labels for each visible column in the hub. If a column is hidden in the Columns settings section, the field to edit the label for that column will not be visible. The action column will default to not having a label, but you can set one for it here if it is a visible column.